Right hand movement is the physical action that actually equates to strumming. In its most simple form, there are two ways to strum the strings with your right hand – down and up. There of course are other variables which we will look at in other lessons (such as string selection and dynamics) but essentially you can strum the strings in a downwards direction and an upwards direction with your right hand (I’m assuming for the sake of simplicity that everyone reading this is right handed).
A good exercise to do is to pick up a guitar and finger a chord with your left hand. I would recommend playing a chord that uses all 6 strings, such as an open E chord. Once you have the chord ready, simply strum down, then up, then down, then up etc. Try to be as consistent and even with your timing as possible. This is the basic action of strumming. If you can’t do this, you need to keep practicing it until you can, before moving on. Don’t worry if the sound is a little inconstant or sluggish. Of course, we ultimately want evenness and groove, but this will come.
The part where strumming gets quite interesting (and sometimes challenging) is when applying it to different rhythms. This is where a lot of beginners get confused. What rhythm should I strum? Which directions should I use? These are common questions that often aren’t addressed when songs are being learnt.
Working With Subdivisions
The best way to understand strumming is from an almost mathematical approach. This is because strumming relates very closely to rhythm and rhythm is a metric concept. If you do not understand the fundamentals of rhythm, read the post before moving on. Assuming you have read it, or already have a good understanding of rhythm, let’s explore how strumming directions fit in with subdivisions.
Generally speaking, with any rhythm, we play only down strokes on all the down beats of the bar. A down beat is a beat that falls on either 1, 2, 3 or 4 (and not in between).
Let’s look at the first few rhythms that were presented in the post on understanding rhythm. I won’t put the audio examples here.

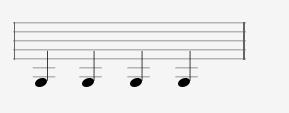
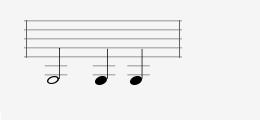
In the above examples, all 3 rhythms contain notes that are on the down beats, so we would strum these rhythms using down strokes.
The real art lies in dealing with subdivisions, such as 8th notes and 16th notes.
Let’s look at a constant 8th note rhythm

It will help to also look at how we would count this rhythm.

Ok. This is where the rules come in. When dealing with 8th notes, everything on the down beats (the numbers) is played using a down stroke (just like before) but everything on the up beat (the “ands”) is played using an up stroke. Based on our constant 8th note rhythm above, if we illustrated how this would look with arrows (aligned to the counting, which never stops!), we would get the following:

That’s pretty straight forward. The challenge comes in applying the rule when the rhythm changes and the 8th notes are mixed in with quarter notes and half notes etc. Remember, the rule still applies. Use down strokes for the numbers and up strokes for the ands. Let’s look at a few examples.
8th Note Example 1
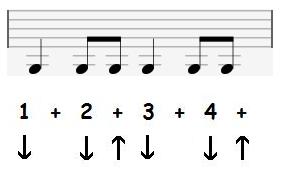
8th Note Example 2
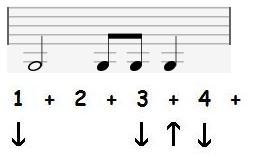
8th Note Example 3
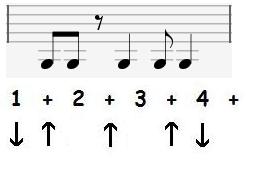
It’s a very good exercise to count out loud and practice the above rhythms with the strumming directions as indicated. Of course, if you think you’ve got the hang of it, you can come up with your own rhythms and strum accordingly, using the principles discussed. It might seem like a there is a lot of thinking involved and might feel robotic and mechanical to start with, but here’s the great thing: After practicing this technique for a while, it becomes natural to the point where if you can hear a rhythm in your head, you can strum it correctly without thinking about it. This is because although we have analyzed the technique from a technical perspective, it is really based on a natural instinct. Essentially what is happening is that you are strumming down and up constantly, but only connecting with the strings when necessary. It is like the strumming happens subconsciously in the background (down, up, down, up etc.) and when a rhythm needs to be expressed, the hand connects with the strings. In fact, this is a great way to practice strumming. Practice strumming constantly down and up but deliberately miss the strings. Then experiment with letting your strumming hand connect occasionally with the strings. Or do the opposite. Strum down and up constantly but connect with every strum and then experiment with deliberately missing the strings but continuing the motion of the hand. Never stop the down/up motion, simply be selective about which movements connect with the strings and which don’t. If you watch a professional guitarist strumming, often it looks like their right hand is on autopilot and their hand is simply connecting with the strings when necessary. This is because essentially this is exactly what is happening.
16ths Notes
The same principle applies when playing 16h note rhythms, but because we have more subdivisions, we need to use down strokes for the numbers and the “ands”, and use up strokes for the “i”s and the “a”s.
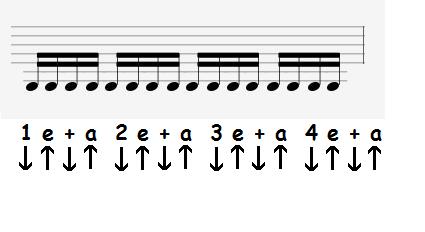
As You can see here, the continuous 16h note rhythm is played by a constant down up motion, much like the execution of a constant 8th note rhythm. Pretty simple right? Of course, the same principle applies as before when using 16th notes amongst along side different rhythmic values. Everything that falls on the numbers and ‘+’s uses a down stroke, while everything that falls on the ‘e’s and ‘a’s uses an up stroke.
Now here is a very important clarification. Remember with the 8th note rhythms, the ‘+’ is played with an up stroke but here we see that with 16th notes, the ‘+’ is played with a down stroke. This at first seems confusing. How can one keep a constant motion if you a required to change the direction of the stroke depending on which subdivision is being used? The answer is quite simple. Generally speaking, most strumming rhythms fall into two categories:
- Rhythms that use 16th notes
- Rhythms that do not use 16th notes
Basically, if the rhythm(s) uses 16th notes, you use a down stroke for the ‘1’s, ‘2’s, ‘3’s, ‘4’s and ‘+’s and an up stroke for the ‘e’s and ‘a’s.
If the rhythm(s) does not use 16th notes, you use a down stroke for all the down beats and an up stroke for all the ‘+’s.
But don’t rhythms sometimes change within a song from bar to bar? Yes, they do, but here’s the thing – Most of the time, while rhythms may change within a song, the subdivision that is being used stays the same. This is because subdivisions affect the ‘feel’ of a song and it makes sense to keep the feel of the song the same from start to finish. So while the rhythms within a song might vary, the feel usually stays the same and there for the subdivision being used also stays the same. This means that if a song uses 16th notes at any point, we should generally maintain a 16h note subdivision even for bars that don’t contain rhythms smaller than an 8th note. That might seem confusing. Don’t worry, we will revisit this later with some more examples.
Of course there are always exemptions to the rule. We haven’t even touched on how to deal with a few other subdivisions such as triplets etc. but 8th notes and 16th notes cover such a large portion of strumming material that it is really all you need to understand when starting out.
More Examples
Let’s look at some more examples to really drive home the principles. We’ll have a look at three 8th note examples and three 16th note examples. Each example is a 2-bar rhythm.
I have added a an extra illustration to these. So far we have looked at rhythmic notation and underneath that we have looked at counting (using the relevant subdivision) with an arrow underneath each subdivision indicating which movement to use when necessary. The third illustration that we are now using effectively illustrates a constant movement of down and up (as discussed earlier) with a circle around each movement that is a ‘connecting’ strum. It’s important to understand that all three illustrations are attempting to convey the same message using a slightly different approach.
8th Note Strumming Rhythm 1

8th Note Strumming Rhythm 2

8th Note Strumming Rhythm 3
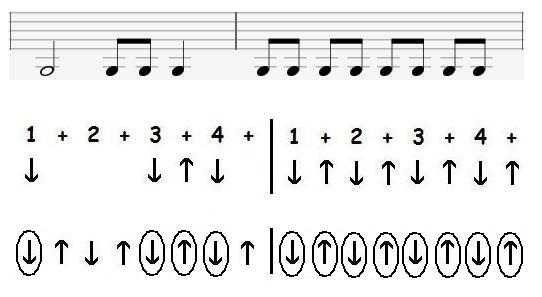
16th Note Strumming Rhythm 1

16th Note Strumming Rhythm 2

16th Note Strumming Rhythm 3

There are no audio examples included in this lesson but we will look at some examples in a separate post with audio examples. Let’s keep this post strictly informational. Let’s revisit one last thing before wrapping up. Let’s look at the third example of 8th Note Strumming Rhythm and the third example of the 16th Note Strumming Rhythm. Now let’s look at the 2nd bar of each. Notice that the rhythm is exactly the same in each example, but the strumming directions change. This is a perfect illustration of the point made earlier when explaining the difference between use of 8ths and 16ths. Because the 16th note example uses 16th notes, we are using a down stroke for the ‘+’s, even though there are no 16th notes in that specific bar. Of course, the 8th note example does not use 16th notes, so all ‘+’s are played with an upstroke.
