In this lesson we are going to look at interpreting scale/arpeggio shapes and discuss the best way to practice them.
What does a shape look like?

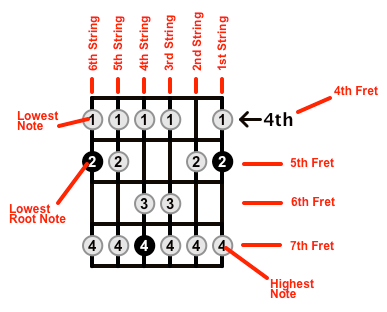
Here is a typical looking shape. It is actually the shape of a major scale. It is essentially a diagram of frets and strings, with fingers being represented by circles containing numbers.
The strings are set out vertically, with the 1st string to the far right and the 6th string to the far left.
The frets are set out horizontally, with the lowest fret up the top and the highest fret down the bottom. In this case, the lowest fret is the 4th fret, because there is an arrow pointing to that fret, telling us that this fret is the 4th fret.
The circles with numbers in them indicate a the finger to use, in order to play that particular note. The black circles are the root notes. The grey circles are non-root notes.
Above is a typical example of what a scale or arpeggio shape will look like, when written as a diagram. Let’s look at an example with extra markings (in red). These markings are usually omitted. You just need to memorize the format, so that you can interpret the diagrams without them.
Playing the Scale/Arpeggio in One Position
Now that you understand what everything in the diagram means, you need to know how to practice such a shape.
One option is to start at the lowest root note (pitch-wise) and ascend through each note until we reach the highest root note. Then we would descend back down to the lowest root note again (our starting note). This would look like this:
By doing this, we would have played the A major scale over two octaves, ascending and descending.
While this is a perfectly good exercise and expression of the A major scale, for the sake of playing the notes of one position, there is a shortfall – It leaves out the notes that are outside the range of the 2 octaves, but that are contained within the given position (or shape). Because we want to play the entire range of notes in the shape, there is a better system.
The System
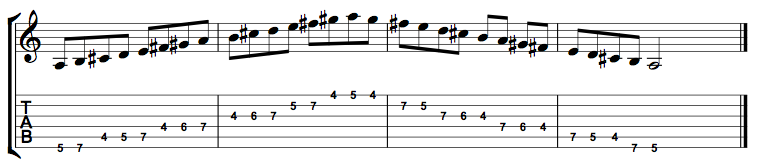
The way to do it is like this. We start from the lowest root note, ascend all the way up to the highest note in the shape (see the diagram with markings). We then descend to the lowest note in the shape and then finally ascend back to the lowest root note. Here is an example, using the same shape that we used before.

The beauty of this approach is that we are still staying true to the scale in question, because we are starting and finishing on the root note. The benefit is that we are not limited to playing 1 or 2 octaves. We are able to play all the notes that are in the shape.
Let’s do 1 more example. This time we’ll use an arpeggio shape
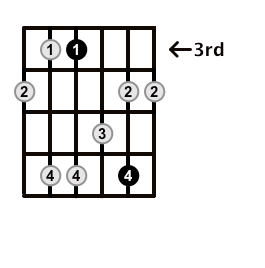
This is an F minor 7 arpeggio. This is a good example because the lowest root note is on the 4th string, which means there are a few notes that are lower than the root not. Here is how we would play the arpeggio, using complete position approach:
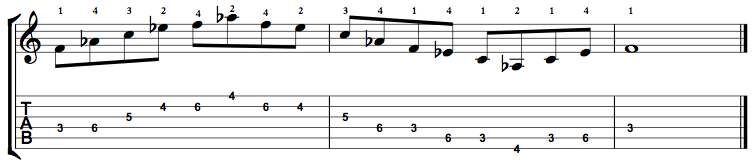
What we have done is this:
- Start from the lowest root note (in this case the 3rd fret of the 4th string).
- Ascend all the way up to the highest note in the shape (4th fret of the 1st string).
- Descend to the lowest note in the shape (4th fret of the 6th string)
- Ascend to the lowest root note (starting note)
This is the system used on this site for practising scales/arpeggios. It provides a clear approach with little room for interpretation.