I’ve already written extensively about the importance of major scales. There are already posts on understanding major scales and links to playing the shapes up and down the fretboard in every key.
This lesson is really a summary. It is designed to be a practical guide to learning major scales thoroughly.
Know the Theory
It is important to have a general idea of what major scales are, how they are used and why they are important. We are not going to get into the theory in this lesson, but if you need to brush up, read the following post:
A Complete Guide To Major Scales On The Guitar
Know the Interval Structure
The major scale, in its most basic form, is a sequence of intervals. It is important to know this sequence:
Root Note – Tone – Tone – Semitone – Tone – Tone – Tone – Semitone (Root Note Again)
Play the Scale on One String
The easiest way to play the major scale, is to play the entire scale, over 1 octave, on 1 string. While this may not be the most practical use of the scale, playing it in this way allows you to ‘see’ the interval structure from a visual perspective. It also means that once you have memorized the interval structure, all you need is a starting note, and you can play the major scale in any key. Here is an example of playing the G major scale on the 6th string only:

Learn 5 Positions and Practice Them in Different Keys
The real challenge with learning major scales (as with any scale) is to learn them in 5 positions. Below is a diagram which shows the 5 movable major scale shapes. The reason why we want to learn 5 shapes is that by doing so, we will cover the whole fretboard. The 5 shapes below are set out in a kind of circle. Each shape is ‘connected’ to its two adjacent shapes. The reason the shapes are set out in a circle is because the shape that you begin with changes, depending on what key you are playing them in. Let’s look at the shape and then explore this further.
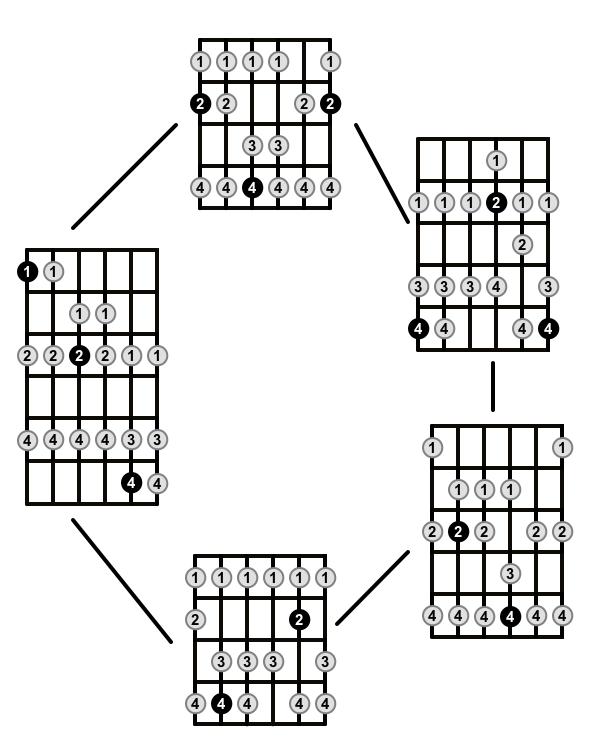
You should pick a key (for example G) and starting with the lowest position, play through each shape. In the key of G (for example) the upper most shape in the above picture would be the first shape – you can play this shape starting on the 3rd fret with your 2nd finger. In the key of D however, the lowest position would be the bottom shape (starting on the 5th fret of the 5th string with your 4th finger). The next position in the key of D would be the shape to the right of the one I just described.
In summary – pick a key, find the lowest position for that key, play through that position, then move to the next, and then the next. Once you have played through all 5 positions in one key, test yourself by changing keys and doing it again. You will get quicker and quicker at this as you memorize the shapes.
Playing All of the Notes of a Position
When playing a certain shape, start from the lowest root note (pitch-wise) and play through each note until you get to the highest note in the shape (which probably won’t be the root note). Then descend to the lowest note in the shape and then finally ascend back to the lowest root note. Here is an example of the D major scale starting on the 5th fret of the 5th string with the 4th finger:
Practise Patterns
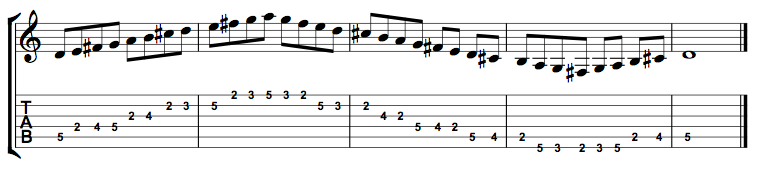
Once you have memorized each shape and can pick a key and move easily through the positions in that key, it’s time to start playing patterns. Patterns are a great way to break up the predictable nature of scale playing and provide a great technical challenge. master at least on pattern for each shape. The most useful pattern is 3rds. This means that you play the 1st note of the scale, then the 3rd, then the 2nd, then the 4th, then the 3rd, then the 5th and so on and so on. Playing a scale in 3rds is just one pattern. There are theoretically an infinite number of patterns, but you should start with mastering 3rds.
Here is an example of that same D major scale in 3rds:

Improvise/Learn Phrases
Improvising and learning phrases is where the fun really begins. Once you have mastered each shape and can play each shape from start to finish as well as using patterns, it’s time to start exploring each shape by learning phrases and improvising. The art of improvising and phrase composition is a little bit outside the scope of this short lesson, but the best advice is to just do it! Put on a backing track of some sort. All you really need is a repetitive major chord, looping over and over again. Then, start improvising within a shape. Try not to move outside the shape for now. You can do that later. The aim of the game here is to get to know the shape from a deeper level. When you improvise, technically any note in the position that you are using, is available. Therefor, it is important to be able to really ‘see’ each note in the position and not just rely on muscle memory that is developed when playing each note in order, one after the other.
Connect the Positions
By this stage, you should be very comfortable with the shapes and know them inside out. Now you need to be able to connect the different positions together. Connecting shapes together is not difficult, but there is not necessarily a set way of doing it. You can play 4 notes of one shape, then move to the next position. Or play 5 notes of one position and then move up by 2 positions. You can move between shapes using patterns, change on different strings, using different fingers etc. The infinite possibilities makes experimenting with connecting the shapes quite an open ended task, but also a fun and creative one. Therefor, the best thing to do is to treat it as an improvisation exercise. If you have learnt the individual shapes using the process detailed above, connecting them together won’t be hard. You just need to experiment. Put the backing track on and come up with different ways of connecting the shapes together.