Each piece in the book ‘Open Chords Made Easy‘ contains a rhythm guitar part that is divided into two sections:
- Chord Chart
- Strumming Guide
Chord Charts
A chord chart (as seen below) is a standard way of transcribing the chords of a particular song or piece of music. Chord charts vary in format and depth of detail. The thing that makes the chord charts that are in the book easy to follow, is the inclusion of rhythms with each bar, and the accompanying strumming guide. Look at the example chord chart below and then read the following explanations.
This lesson is an adapted lesson from the ‘Open Chords Made Easy’ book. You can view the index of lessons from this series here, or purchase the book itself from here.

Chords List
Underneath the title on every chord chart is a list of chords that are used in that particular piece of music. Each chord in this list has a unique number (or ‘Chord ID’) associated with it. This is because variations exist for some chords, so the unique number specifies which variation should be used for that particular piece. Also, the ‘Chord ID’ can make the process of locating chord diagrams quicker. Individual chord diagrams are not included on the chord charts themselves, but rather are listed in a separate section (see Chord Diagrams). This means that if you are unsure of how to play a particular chord, you will need to consult a different page to find out. This is a deliberate design. While this process is seemingly harder (and perhaps slightly frustrating), it requires that the first step of learning any piece is becoming familiar with the chords. Memorizing chords is easy. Developing the technique to be able to use them effectively in music is the challenge. Omitting chord diagrams from each chord chart forces you to memorize the chords early and then focus on the process of actually using them in the piece of music.
Chords
Above each bar is at least one chord. (see How to Read Chord Diagrams). The chord (or chords) that is assigned to a bar is the chord that you play while strumming the rhythm for that particular bar.
Rhythm
Each bar contains a notated rhythm, or a repeat sign to indicate that the previous bar’s rhythm is to be played again (see Repeats). We have avoided using standard music notation up to this point, so why are we using them on the chord chart? Good question. These rhythmic notations may be useful to some who prefer reading them and for the sake of being thorough, they have been included. But understanding them is not required. The important thing is to observe the rhythm number underneath (i.e. ‘RHYTHM 1’, ‘RHYTHM 2’ etc.). Each of these rhythmic labels correspond to a visually detailed explanation of the rhythm in the ‘Strumming Guide’ for that particular piece. This is all explained shortly.
Repeats
While knowing music notation is not required, being familiar with how repeats work will make your life easier. Read the section on repeats to familiarize yourself with them.
Mid-Bar Chord Changes
Most of the time, a change of chord occurs at the start of a new bar. There are quite a few pieces however, which contain chord changes mid-bar. While these changes are obviously more difficult, the process is quite simple. This is explained in further detail down the page.

Strumming Guides
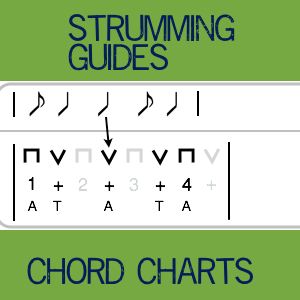
For each piece of music in the book, there is a strumming guide. The strumming guide is what really sets the book apart from other books relating to chords and strumming. In the explanation of chord charts, we saw that each bar has a rhythm and an accompanying rhythm number assigned to it. In the strumming guide, each of these rhythms is visually explained, based on the system that has been used to explain rhythm in the first chapter of this book. It is visual guide to what each rhythm is and how the strumming pattern fits perfectly with it.
Observe an excerpt from a strumming guide. This is from the same piece that was used to demonstrate the chord chart that we looked at.

- The first row contains the rhythmic notation version of the rhythm.
- The second row (the first row beneath the dividing line) contains the strumming directions. This is the exact same format as the example exercises used in the first section of this book. The important thing to remember is that the black symbols indicate a connection with the strings. The grey symbols indicate that the strings are missed, but the movement still occurs.
- Underneath the strumming directions is a row of numbers indicating the beats in the bar and how each count aligns to a strum. Again, the format for this row is the same as in the example exercises. The counting should always continue, but the black numbers (or black ‘and’s) indicate when a strum connects with the strings.
The bottom row indicates string selection (see String Selection below) and is aligned with the strumming directions and the counts. Since string selection only applies to connecting strums, string selection symbols are only used for strums and counts that are bold (not grey).
Most of the rhythms used in this book are one-bar rhythms. However, a few pieces contain two-bar rhythms. The principles remain the same for two-bar rhythms, but there are in these cases, of course, two bars.
Mid Bar Chord Changes
Some pieces require that you change chords mid- bar. This is slightly more difficult than changing chords at the start of a bar. To avoid confusion as to exactly where to change chords (when a mid-bar chord change is required), an arrow system is used to indicate exactly where the change takes place. In the example below, Dm is obviously played on the first beat of the bar. The placement of the G chord however, is not as obvious without the arrow. With the arrow included, you can clearly see which strum the chord change is aligned to.


Standard Rhythm
The rhythm below is what we will refer to as a ‘Standard Rhythm’. It involves playing a chord on the first beat of the bar and then letting it ring for the duration of the bar. We are giving it a specific label is for two reasons:
- It is very easy – it involves one strum on the first beat of the bar and nothing else for the rest.
- It is very common – a lot of pieces include this rhythm, usually in the final bar of the music. Rather than illustrating the rhythm every time it is used, it makes more sense to illustrate it once, give it a label and then refer to the label from thereon.
Therefore, the ‘Standard Rhythm’ has been illustrated here but you will not find it in any of the strumming guides. When you see ‘STANDARD RHYTHM’ underneath a bar, you will know that it is referring to this specific rhythm.

String Selection
There are many variables involved with strumming. At this stage, we are concerned only with the main ones (rhythm and strumming directions). The others are important, but are not necessary to use at this stage for the following reasons:
- They can be quite easily added in later, once you are confident with the basics.
- The are totally pointless if you don’t have the basics down.
- Some of the variables (like dynamics) can be developed largely by experimenting.
The one variable that has ben added is ‘String Selection’. As the name suggests, string selection is about which strings to strike when strumming. Varying the strings that are being strummed is a good way to add texture and interest to a strumming pattern. For the sake of keeping things simple, we are only going to use only four options:
A = All Strings – This requires strumming all of the strings in the chord. Note that ‘all of the strings’ does not necessarily mean all of the strings on the guitar, but rather all of the strings that are should be played with that chord. The D chord, for example, only uses four strings, so an ‘A’ in this case would signify strumming only four strings.
B = Bass Strings – This requires strumming only the bass strings of the chord. Again, this is affected by which chord is being played at the time. Some chords include the 6th string, some don’t. The ‘Bass Strings’ are the lowest (in pitch, highest in height) two or three strings of the chord. You can be approximate here – Most strumming patterns don’t require accurate execution of precise strings.
M = Middle Strings – This refers to the middle two or three strings of the given chord. Again, pay attention to which strings are included in the chord and remember that you can be approximate with this middle range.
T = Treble Strings – The treble strings refers to the highest (in pitch – lowest in height) strings of the given chord. Again, it can be approximate.
When learning a song, it is a good idea to ignore the string selection component to start with. While string selection can be used to add finesse and expression to a strumming pattern, it should be added in only when you feel confident with the chords and rhythms of the particular piece that you are playing.
Your first goal should be to be able to play the whole piece by strumming the rhythms with full strums (‘A’s). This will still sound correct and musical. Only once you have mastered a song, should you then try to introduce the string selection variations.
This lesson is an adapted lesson from the ‘Open Chords Made Easy’ book. You can view the index of lessons from this series here, or purchase the book itself from here.