
This lesson is a follow-on from the lesson on basic intervals. In that lesson, we explored the concept of tones and semitones. If you’re unsure of what tones and semitones are, read the lesson here. In summary, a semitone is an interval of one fret and a tone is an interval of two frets.
In this lesson, we are going to use our knowledge of basic intervals to explore the musical alphabet – the twelve notes that all musicians have available to them. We are then going to use that knowledge to unlock the notes on the fretboard.
The Natural Notes
A – B – C – D – E – F – G
In the musical alphabet, that’s all there is. Seven notes from A to G.
Ok, there are ‘sharps’ and ‘flats’ as well, which we will get to in good time, but the above notes are all of what are called the ‘natural’ notes. The first step in unlocking the fretboard is to understand the natural notes and the intervals that separate them.
Each note is separated by a tone, except for the intervals from B to C, and from E to F.
Observe the following diagram:

The above image makes the intervals between each note pretty clear. Also, it’s worth observing that the note A is listed twice, to show that after we cycle through the notes in the musical alphabet, we end up at the first note again, up one octave. The ‘list’ of notes would perhaps work better, written out as a cycle:

Using The Musical Alphabet To Unlock The Notes On One String
The theory so far has been pretty simple, but we want to make sure that you can actually apply it to the guitar. In the lesson on tones and semitones, we discussed how staying on one string allows us to really see the intervals as we play them. By moving through each note on one string and using your knowledge of the musical alphabet, you can effectively figure out where the notes are on a particular string. All you need is a starting point, such as the names of the open strings.
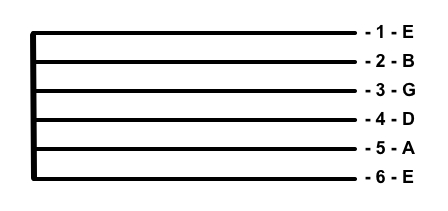
In the above image, we have the names of the six open strings of the guitar. Remember, the bottom string (6th) of the image is actually the top string (height-wise) on the guitar. Let’s say we start with the 6th string (E).
- The open string (effectively a ‘zero’) is E.
- Using our knowledge of the musical alphabet (refer to the original diagram if you wish), we know that to get to the next note (F), we have to move up a semitone (1 fret). So we move from ‘0’ to ‘1’, which takes us from ‘E’ to ‘F’.
- There’s a tone (2 frets) from F to G, so from F, we move up 2 frets to G.
- And so on.
From a tabs perspective, going through a full octave on the E string would look like this.

Let’s do another example, using the 3rd string (G).

The same process applies. In this example, we are starting from G (because the open string is G). Since the interval between G and A is a tone, we move from ‘0’ to ‘2’, in order to go from ‘A’ to ‘B’ and so on.
As you can see, once you have a starting point (the names of the open strings), you can figure out any note on the fretboard, using your knowledge of which notes are separated by tones and which are separated by semitones.
You don’t necessarily have to start from an open note. If you already know (for example) that the 7th fret of the 3rd string is the note ‘D’, but you’re not sure of the notes around it, you can start from that ‘D’, and then move up (or down) from there.
Given that semitones only occur in two places (from E to F and from B to C), it’s probably easiest just to remember where the semitones occur, as the rest of the intervals will just be tones. This would be how you could picture it in your head:

Sharps And Flats
So you now know how to figure out all of the ‘natural’ notes along the entire fretboard. That’s a pretty powerful ability. Of course, as you probably already know, we do have to address the ‘in between’ notes.
The notes ‘A’ and ‘B’ are separated by a tone. That means that there is a note in between, that we haven’t given a name to yet.
The note in between A and B is ‘A sharp’, or ‘B flat’.
When we move a natural note up by a semitone, it becomes a ‘sharp’. When we move a natural note down by a semitone, it becomes a ‘flat’.
That is why the note in between A and B is ‘A sharp’ and ‘B flat’. It can be referred to by both names (even though one is usually more appropriate depending on the context of the music, but we’re not worried about that at the moment). This is known as enharmonic equivalence. The notes ‘A sharp’ and ‘B flat’ are enharmonically the same.
We use symbols to represent sharps and flats. They look like this:


Sharps and flats occur between every two natural notes that are separate by a tone. For example:
The note between C and D is C# or Db.
The note between D and E is D# or Eb.
Knowing about sharps and flats means that you can now technically view the musical alphabet with sharps and flats included:
A – A#/Bb – B – C – C#/Db – D – D#/Eb – E – F – F#/Gb – G – G#/Ab – A
Each note in the above list is separated by a semitone. We could therefor plot out the notes on one string, including the sharps and flats, like this:

This is a perfectly accurate display of the notes along one string. As you can see though, it starts looking a little messy. Which is why even when searching for sharps and flats, it’s much better to use the system that we used before.
Let’s say we wanted to locate the note ‘Eb’ on the A string. Rather than going through every natural note and sharp/flat, it would be easier to simply go through the natural notes on the A string (using the above system) and when we found E, we could simply move down one fret so that we would be playing ‘Eb’. This would look something like this:

By focusing on becoming familiar with the natural notes, we can easily locate a particular sharp or flat by extension.
Using The Cycle Of 4ths To Put Your Knowledge To The Test
With the information contained in this lesson (and perhaps the lesson on basic intervals), you now know how to figure out any note on the fretboard. Good work! But of course, the party trick is even better if you know every note, without having to think about it. How do you do that? With practice. That’s all it really takes. A great tool for practising this is what’s called the ‘Cycle of 4ths’ (or cycle of 5ths).
It is basically a cycle of all the notes in the musical alphabet, separated by intervals of 4ths (clockwise) and 5ths (anti-clockwise). You don’t need to understand what a 4th or 5th is just yet. You just need to know that organising them in this way allows us to move through every note in the musical alphabet. It looks like this:

What do you do with it? Simply choose a string, then go around the cycle locating each note on the chosen string. What will happen is that your first time around the cycle will take quite a while. You will constantly be ‘figuring out’ where each note is, one at a time. What will happen though, is that you will eventually become quicker and quicker, as you start remembering where all of the notes are, from playing them repetitively. Eventually you will just know where the notes are for the string you are working on. Then you can move onto the next string and so on.
Getting to know the fretboard isn’t hard, it just takes a bit of time and attention. It’s a very powerful skill to know where every note is, and it’s not hard to put it into practice, so you might as well get to it!

Thanks pal and best wishes. Cheers !