
In this lesson, we’re going to look at how to interpret scale diagrams. Scale diagrams are used a lot throughout this site, so it’s important to understand how to read them.
Before we get right into it, it’s important to understand that conventions for writing out scales do vary, depending on who is writing them out. The main point of variation being the direction in which the strings and frets are set out. Some people place the strings in the diagrams horizontally, the frets vertically and some people do the opposite.
Scale Diagrams
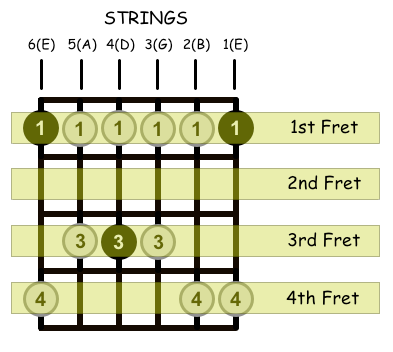
Here is an example of a scale diagram, using the format adopted on this site.

It is (just for the sake of this example), one position of the Minor Pentatonic scale. The vertical lines represent the strings. The horizontal lines (or spaces in between) represent the frets. The circles with numbers in them represent fingers, with each number being a reference to it’s respective finger (on the left hand).
If that seems a bit confusing, observe the following diagram with markings.
This demonstrates pretty clearly what everything is. You may not yet know what to do with the diagram, but we’ll get to that shortly.
If you are comfortable with reading chord diagrams, the format is exactly the same. All that changes is what you actually do with the information. With a chord diagram, you play all the notes at the same time. With a scale diagram, you play each note one by one.
How To Interpret Scale Diagrams
Now that you know what all the lines and numbers mean, you need to know what to do with them. What we’re going to do now is play the minor pentatonic scale, using the shape(s) above, over one octave.
The circles with numbers in them represent playing a note, with the finger of the same number. Each circle intersects a number and string. When we see a circle, we simply play the fret and string that the circle intersects, using the finger of the same number.
Let’s look at the original scale diagram. At the top left of the diagram, there is a circle with a ‘1’ in it. It is aligned with the first fret, on the 6th string (E). Therefor, to play that note, we would simply play the 1st fret of the 6th string with our 1st finger. It’s as simple as that.
You should practise playing a few of the notes in the diagram, choosing notes at random and making sure that you are using the correct finger to play the fret and string that it is aligned with.
Root Notes
Of course, when we interpret scale diagrams, we don’t just play notes at random. We play each note one at a time in an orderly way.
Before we look at the order of notes, there is one more thing we need to look at – root notes.
The root notes tell us which scale we are playing. For example, when we play a ‘G minor pentatonic scale‘, the root note is ‘G’. When we play an ‘A Mixolydian scale‘, the root note is ‘A’. When we play a ‘C# dorian scale‘, the root note is ‘C#’. You get the point. Think of the root note as the ‘home’ note. It also tells us where we should start the scale.
With scale diagrams, the root note(s) is usually a different colour than the rest of the notes. In the diagrams above, the root notes are darker than the rest. The reason why there are three root notes in the original diagrams is because the root note occurs in a few different octaves. Basically, it’s the same note each time, but in a different range.

Order Of Notes
Ok, so let’s get playing. Let’s look at the original diagram of the minor pentatonic scale, without markings:
You should know what all the lines, circles and numbers mean (if you don’t, you can reread the explanations leading up to this point). Now all you need to know is the order of notes.
What we are going to do is play the scale over one octave. This means that we are going to start with the lowest root note and go up to the next root note and then stop. Once you know how to apply the order of notes, it will be easy to go through the other notes, but for now we’re going to use one octave only.
The first step is to locate the lowest root note. By lowest, I mean lowest in pitch. This can be confusing, because it’s easy to confuse ‘lowest in pitch’ with ‘lowest in height, or number (string number)’. For example, the 6th string, is lower in pitch than the 5th string. The 5th string is lower in pitch than the 4th string etc.
To find the lowest root note, simply locate the lowest string (pitch-wise) that has a root note. In our diagram above, the root note occurs in the following places:
- 6th string (E string)
- 4th String (D string)
- 1st String (E string)
Which is the lowest string out of these three? The 6th string.
Therefor we start from the root note that is on the 6th string. Since that note is aligned to the 1st fret, and is represented by a circle with a ‘1’ in it, we start out by playing the a note on the 1st fret of the 6th string with our 1st finger.
We have played the first note. Great. Now we just need to play through the other notes in order of pitch, until we reach the next root note. This basically means that we need to play any other notes remaining on the same string, in order of fret number, then we move to the adjacent string (higher in pitch) and play through each of those notes in order of frets, then move to the next string and so on.
Even thought this is quite simple, it’s very hard to explain without making it seem more difficult than it is. For this reason, I have included another version of the same scale diagram, but with extra numbers in red, indicating the order of notes.

The order of notes from the above scale diagram should be pretty clear. it’s logical. Playing through the scale, one note at a time, in such a way would result in the following:
Remember, we’ve only played through one octave so far, which means there are still notes in the diagram that we haven’t used yet. Also, we have played an ‘ascending’ scale, which simply means that we have gone up in pitch through the scale. If we were to go back down the way we came, one note at a time, we would then be ‘descending’.
Why Shapes? Why Not Tabs?
Perhaps your asking, ‘why bother with scale diagrams, when you can just use tabs, like you just did?’. Good question. The beauty of scale diagrams, or ‘shapes’, as they are sometimes referred to, is that they are moveable. This means that you can interpret them to be played in different positions. Tabs are great for telling us how to play a scale in a specific location, but they are not inherently movable, like diagrams are.
In the original diagram with markings, the 1st, 2nd, 3rd and 4th strings were annotated to make things simpler, but in reality, these frets could be any adjacent set of four frets, depending on where you wanted to play the scale. Look at the following three diagrams, here I have included the original diagram with markings, as well as two more diagrams, set out in different positions


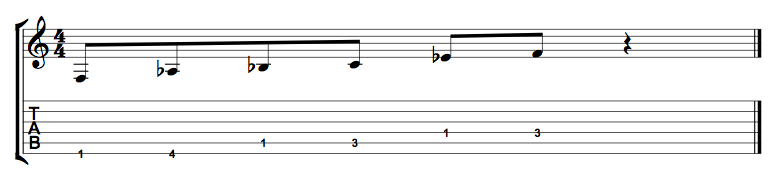
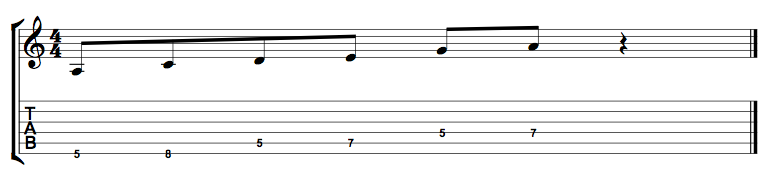
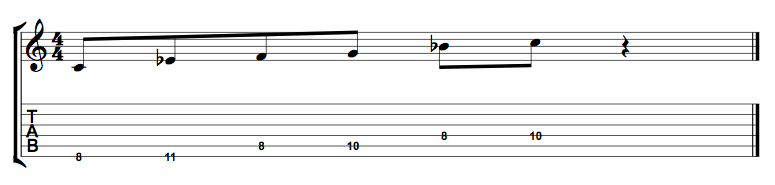
Basically, you can use any set of adjacent frets to change the position of where you are playing the scale. The above three examples interpret the diagram starting on the 1st fret, then starting on the 5th fret, then starting on the 8th fret, which would result in the following:
Starting On The 1st Fret
Starting On The 5th Fret
Starting On The 8th Fret
How do we know which scale we are playing when moving to another position? The root note tells us. If the root note is ‘A’, we will be playing (using this shape) the ‘A minor pentatonic scale’. If we then move to another position and the root note is ‘Db’, we would now be playing the ‘Db minor pentatonic scale’.
Obviously, this requires you to be familiar with the notes on the fretboard, so that you know which note you are actually playing.
Sometimes, the position in which a diagram is to be played is indicated. For example, I could say, ‘The G minor pentatonic scale can be played using the following shape, starting on the 3rd fret’.

Here you can see that the ‘3rd’ with an arrow next to it is telling us where the 3rd fret is.
Diagrams Where The Root Note Is Not The Lowest Note
The above ‘shape’ was an easy one to start with, because the lowest root note was also the lowest note in the diagram. This is not always the case.
Let’s look at another shape where the lowest root note does not happen to be the lowest note in range. This is another shape for the minor pentatonic scale. It’s the same scale, but effectively a different way of playing it.

As you should be able to see, the lowest root note in this diagram is not the lowest note in the diagram.

All this means is that we should still start from the lowest root note (but not the lowest overall note) when interpreting the diagram.
Observe the diagram again, but with the note order in red:

Again, this is a moveable shape, and the root note determines which scale we are playing. Here’s what the scale looks like when starting on the 10th fret. As the root note will be ‘G’, we will be playing the ‘G minor pentatonic scale’.

Using The Other Notes In The Diagram
So far we have learnt to interpret scale diagrams by playing over one octave. As I mentioned earlier though, there are other notes that we can also use.
The best way to practise scales, while going through all the notes in the shape, but not adding in any from another position, is to follow this process.
- Start from the lowest root note
- Ascend up to the highest note available (not necessarily a root note)
- Descend down to the lowest note available (not necessarily a root note)
- Ascending back to the starting root note (if the lowest note in the diagram is not the root note)
Here is an example of applying this process to the scale shape that we just looked at, starting again on the 10th fret.

If this seems a little confusing, there is another post that explains this process in greater detail. Now that you can interpret scale diagrams, the post should be easy to understand. Read it here.
The reason why playing through each note of the shape is important is because it means that you really know the entire shape. Of course, you can play over only one octave if you want, or two if you want, but as guitarists we tend to learn things based on positions. Once you know the shape and all the notes within, you can use it as you wish.
Scale Diagrams In The Open Position
The last thing that we are going to look at is how to interpret scale diagrams in the open position. This means that we will be looking at scale diagrams that have open strings in them. Because of the open strings, these shapes are not moveable. Let’s have a look at the C major scale in the open position.

The only real difference when playing these types of shapes is that you need to look out for the open strings and include them when playing the scale. They are represented by an ‘O’ which is aligned to the string (but not on an actual fret, because open strings inherently do not involve frets). When you are playing through the scale, think of the open notes as ‘zeros’. Because zero comes before any number, if there is a string with a ‘O’ next to it, you play that note before playing the other notes on that particular string.
Once you’ve read a few open scale diagrams, you will see that they are almost identical to moveable diagrams in how you interpret them.
Let’s look at the note order of the C major scale in the open position, over one octave.

As you can see, the process for applying the order of notes is the same as with the moveable scale diagrams, but the open strings are also involved. This is what the open C major scale looks like as tabs.

The root notes can also be open strings. Let’s look at the A major scale diagram in the open position. The lowest root note is played as the open A string. This is therefor our starting note. Also notice that not every string in this diagram is to be played as an open string.


And that’s how you read scale diagrams. Remember, you will often see variations on how they are written. It is common to write out scale diagrams with the strings set out horizontally and the frets vertically. But regardless, if you become proficient at reading one type of scale diagram, reading another type just involves a quick mental switch.
Further Reading
- How To Practise Scales By Staying In One Position – The same lesson I referred to earlier.
- Guitar Scales Page – The scales page of this site. There are more scales than you can poke a stick at!