In the previous lesson, we explored the fundamental elements of a music score, such as the Clef and the Staff. We also explored the basics of rhythm and got practical with some examples using sheet music. If you could reduce all of music to two things, it would be pitch and rhythm. Pitch is about the note that we are playing and rhythm is about how long we play it for.
In the previous lesson, we explored the basics of rhythm. Now we’re going to explore pitch and how we read pitch in sheet music.
Back To The Staff
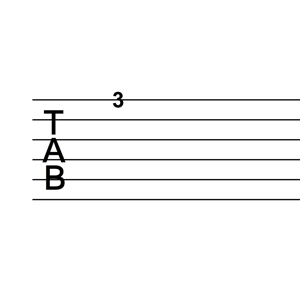
Remember the staff that we learnt about in the previous lesson? Here it is again:

As you can see, there are five horizontal lines that make up the staff. In short, the position of the note head relative to these five lines tells us which note we are playing. Each note head will either be placed in between two lines – effectively in a ‘space’, or placed so that the line dissects the note head.
Introducing E F and G
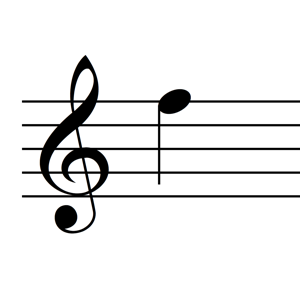
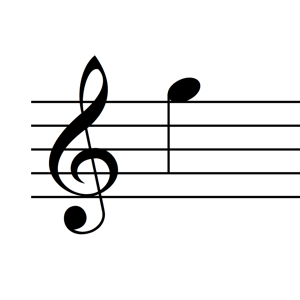
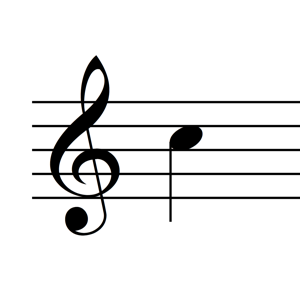
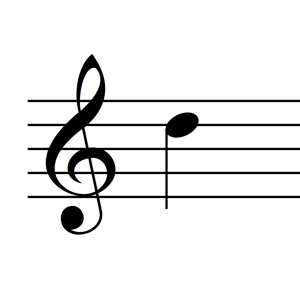
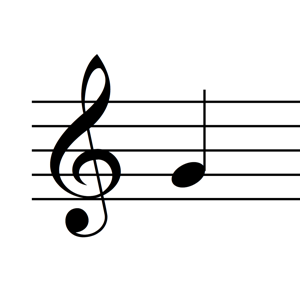
We are going to start off by learning the notes ‘E’, ‘F’ and ‘G’. Observe the image below and observe the difference between the three notes:
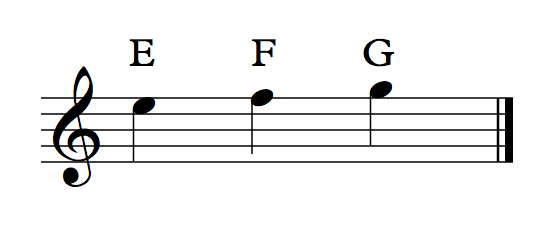
E – The note ‘E’ sits in the top space, or between the top two lines.
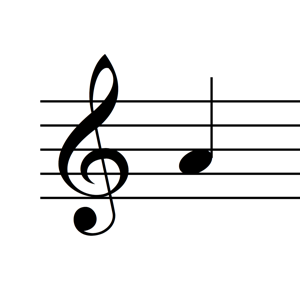
F – The note ‘F’ sits on the top line of the staff (the top line dissects the note head).
G – The note ‘G’ sits above the top line of the staff. Technically this note is not between two lines or being dissected by one, but it’s in a different place to the others, which is what matters.
It’s important to observe what each note looks like and even verbalize the descriptions above, so as to really commit them to memory.
Now that we know how to recognize these three notes on the staff, we need to be able to play them on the guitar.
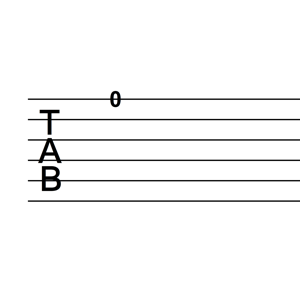
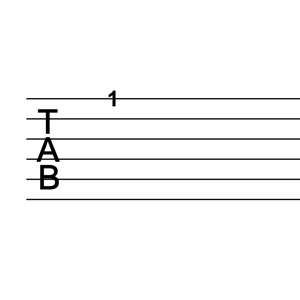
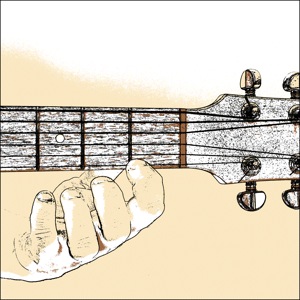
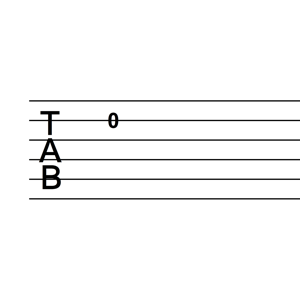
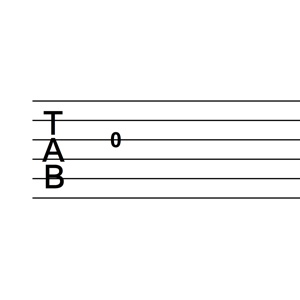
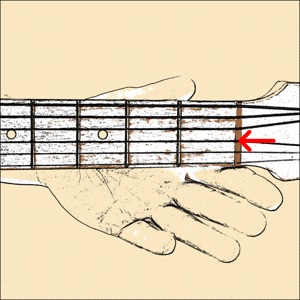
E Note (1st String, Open)
The E note is played by striking the 1st string open. Observe the images below, demonstrating how to play E.
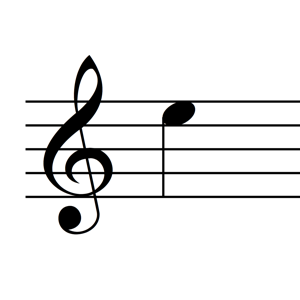
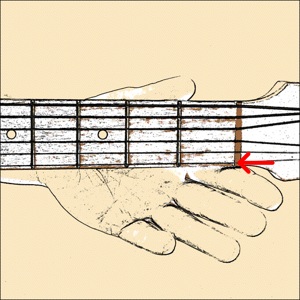
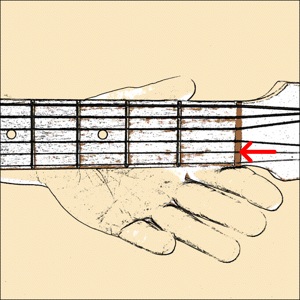
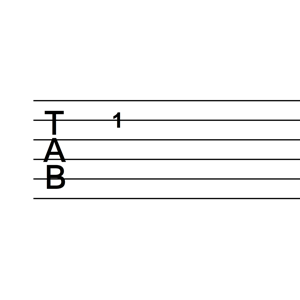
F Note (1st String, 1st Fret)
The F note is played by striking the 1st string on the 1st fret. Observe the images below, demonstrating how to play F. You should use your 1st finger to play F.
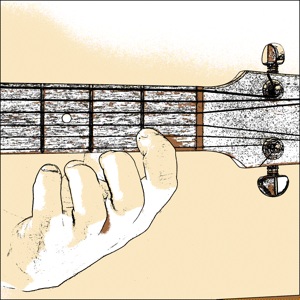
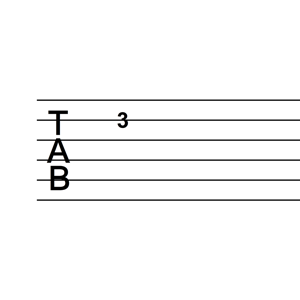
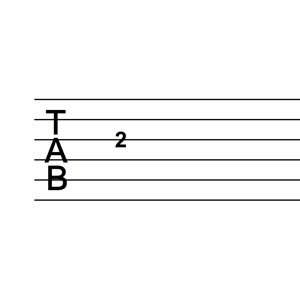
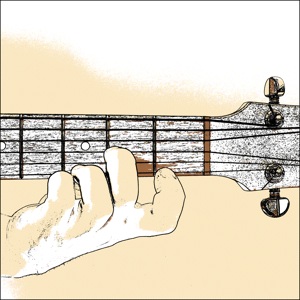
G Note (1st String, 3rd Fret)
The G note is played by striking the 1st string on the 3rd fret. Observe the images below, demonstrating how to play G. You should use your 3rd finger to play G.
We’re now going to look at 10 exercises using the notes E, F and G. The process should be the same as with the exercises of the previous lesson. Just because we are introducing pitch does not mean that rhythm is in any way less important. You should still count out loud, play along with the recordings and test yourself with a metronome. The only difference is that these exercises are slightly harder because you now have to deal with changing notes.
10 Exercises Using E F and G
E String Exercise 1

E String Exercise 2

E String Exercise 3

E String Exercise 4

E String Exercise 5

E String Exercise 6

E String Exercise 7

E String Exercise 8

E String Exercise 9

E String Exercise 10

Say The Notes
A good habit to get into early on, is to practise saying the names of the notes as you are playing them. Once you feel comfortable with an exercise, go through it again saying out loud the name of each note as you play it. Or you can simply go through each note and say it out loud without even playing the guitar. Obviously you can’t say the name of a note and count at the same time, so this exercise should be done in addition to playing the exercises using the format that we have already discussed.

Often I see students working their way through a reading book by creating an association with a note on the staff and a finger position on the guitar, without actually knowing the name of the note that they are playing. This leads to big problems down the track and often involves the annoying process of relearning.
Always ask yourself, ‘can I say the notes?
This will ensure that you develop a strong connection between the note that you are reading, what you are playing on the guitar, and what the note is actually called.
Introducing The B String
The best approach to learning to read on the guitar is to learn one string at a time, while being limited to the notes in the ‘open position’. The open position generally refers to the notes contained in the first four frets of the guitar, as well as the open strings. Once you have learnt the notes on 1 string in the open position, you move to the next string, then to the next and so on. Once you have done this, learning to read in other positions of the guitar is a pretty simple process.
With that being said, let’s move on to the B String.
Observe the staff below that show the notes ‘B’, ‘C’ and ‘D’:
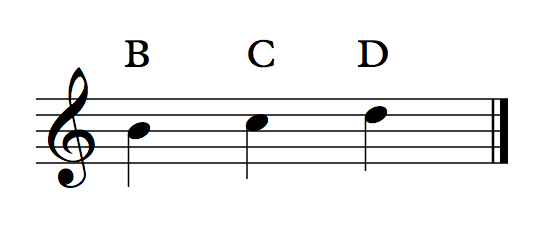
Just like the notes that we learnt on the E string, the notes on the B string have unique positions on the staff. Observe where each note is and verbalize it to help yourself remember (for example the B note is on the middle line).
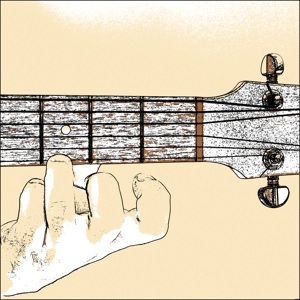
Here is how each note is played on the guitar:
B Note (2nd String, Open):
The note ‘B’ is played as the open 2nd string.
C Note (2nd String, 1st Fret):
The note ‘C’ is played on the 2nd string, 1st fret with the 1st finger.
D Note (2nd String, 3rd Fret):
The note ‘D’ is played on the 2nd string, 3rd fret with the 3rd finger.

Once again, the way to become familiar with reading notes is to use them repetitively in exercises. Here are ten exercises using only the notes on the B string:
B String Exercise 1

B String Exercise 2

B String Exercise 3

B String Exercise 4

B String Exercise 5

B String Exercise 6

B String Exercise 7

B String Exercise 8

B String Exercise 9

B String Exercise 10

Play along with the recordings and try them by yourself. Don’t forget to count! Don’t forget to have a few run throughs where you are saying the names of the notes.
Both Strings Together
The next logical step is to combine the two strings together in the same exercises. This is significantly harder, so be patient. Often, students find individual string exercises relatively easy, but when notes from two different strings are combined together, things become confusing. The important thing is to take it slowly and be patient. If you find that you are forgetting how to play certain notes or are forgetting what they are called, go back and double check. It’s better to be sure than to guess. Saying the notes out loud is especially important here. You want to make sure that you know the name of each note that you are playing. Here are the ten exercises:
Before we do these, another page has been set up which contains the audio examples for the remainder of these exercises. There are a lot of audio files in this lesson, so to avoid loading this current page with too many files and slowing things down, it’s better to access the files from here on in a separate page. To open the audio page (in a separate window), click here.
2-String Exercise 1

2-String Exercise 2

2-String Exercise 3

2-String Exercise 4

2-String Exercise 5

2-String Exercise 6

2-String Exercise 7

2-String Exercise 8

2-String Exercise 9

2-String Exercise 10

Long Notes
It’s time to go back to rhythm. So far, we have used quarter notes (crotchets) and quarter note rests to explore the fundamental concept of rhythm. As you might have guessed, there are notes that are longer than one beat. Because you have already played numerous exercises which involved counting and playing, the concept of long notes should be a fairly easy one to grasp.
Introducing Minums/Half Notes
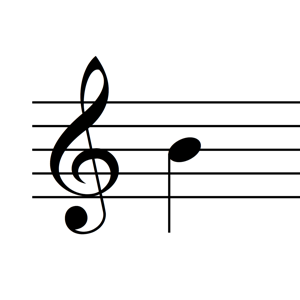
Minums (English) or Half Notes (American) are notes that go for two beats. They look like this:

As you can see, the note head itself is hollow (or white). This is what separates it from a quarter note and tells us that it is a half note.
As I mentioned, the half note goes for two beats. That means that if we play a half note on the 1st beat, the next note will come in on the 3rd beat. If the half note is played on the 2nd beat, the next note will come in on the 4th beat. Remember, the 4/4 counting (“1, 2, 3, 4, 1, 2, 3, 4” etc.) doesn’t stop. All that is changing is what we are playing over the top of it. Often, students make the mistake of seeing a half note and then counting to 2, regardless off which beat of the bar it occurs on. Let’s do a few exercises using half notes. We’re going to go back to playing just one note – the open E note:
Half Note Exercise 1

Half Note Exercise 2

Half Note Exercise 3

What is the difference between a half note and a quarter note followed by a rest?
If a half note goes for 2 beats, and a quarter note plus a quarter note rest takes up two beats, you might ask, what’s the difference? In other words, what’s the difference between the following two exercises:
Half Note Exercise 3 (Using Half Notes)

Same Exercise (Using Quarter Notes Followed By Quarter Note Rests Instead Of Half Notes)

Good question. The difference is that when you play a half note, the note should ‘ring out’ for the duration of 2 beats, whereas with a quarter note followed by a quarter note rest, the note should ring for the duration of the first beat, then there should be silence (the note stops ringing) for the duration of the 2nd beat. In both cases the entry point of each note is exactly the same. The only difference is in how long the note rings for. Let’s listen to an audio comparison of the two exercises (you don’t need to go to the audio page for this):
Using Half Notes…
Using Quarter Notes And Quarter Note Rests…
You can stop a note from ringing (in order to achieve the silence needed for a rest) either by gently touching the strings with you left hand fingers, or by touching the string with your pick (as if getting ready to play another note). By doing this, you are effectively ‘deadening’ the string, so that the note stops sounding. It’s worth noting that when clapping, there is effectively no difference in the two exercises as the sound of a clap cannot be sustained like a note on the guitar can be.
Semibreves/Whole Notes
Semibreves (English) or Whole Notes (American), are notes that go for 4 beats. They look like this:

When playing in 4/4, each bar goes for four beats, therefor a whole note will always go for the duration of the whole bar. There are obviously not a whole lot of rhythmic combinations we can therefor do! Observe and listen to the following example:

Half Note Rests And Whole Note Rests
We have already seen that there are quarter notes as well as quarter note rests. Of course, there are also half note rests (rests that go for two beats) and whole note rests (rests that go for four beats). They look quite similar:
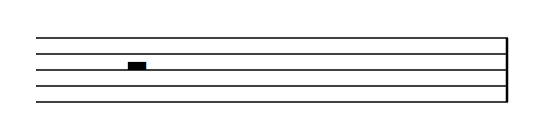
Half Note Rest (2 Beats)
Whole Note Rest (4 Beats)

As you can see, while they may look similar, both are unique. A half note rest looks like a small horizontal line that sits above the middle line of the stave. A whole note rest also looks like a horizontal line but it effectively ‘hangs’ below the middle line of the stave.
It’s time to do some more exercises. Here we are going to use both strings that you have learnt, as well as whole notes, half notes and quarter notes. If you find these hard, remember, there’s nothing wrong with pacing yourself. Work on just one exercise for today and work on another tomorrow (or in a few days, once you have mastered the original). There has been a lot packed into this one lesson, because I wanted this lesson to be thorough, almost like a mini book. But usually you would work on only a few exercises for a few days, then move onto the next ones once they had been mastered.
Long Notes, 2 Strings, Exercise 1

Long Notes, 2 Strings, Exercise 2

Long Notes, 2 Strings, Exercise 3

Long Notes, 2 Strings, Exercise 4

Long Notes, 2 Strings, Exercise 5

Long Notes, 2 Strings, Exercise 6

Long Notes, 2 Strings, Exercise 7

Long Notes, 2 Strings, Exercise 8

Long Notes, 2 Strings, Exercise 9

Long Notes, 2 Strings, Exercise 10

The G String
Now we are going to move onto the 3rd string, the G string. By now you should be able to interpret the material and know how to apply it. Having said that, it is worth pointing out that we are only learning two notes on the 3rd string – ‘G’ (the open string itself) and ‘A’ (played on the 2nd fret using your 2nd finger).
G Note (3rd String, Open):
The note ‘G’ is played on the 3rd string, open.
A Note (3rd String, 2nd Fret):
The note ‘A’ is played on the 3rd string, 2nd fret with the 2nd finger.
Here are three exercises using just the G string.
G String Exercise 1

G String Exercise 2

G String Exercise 3

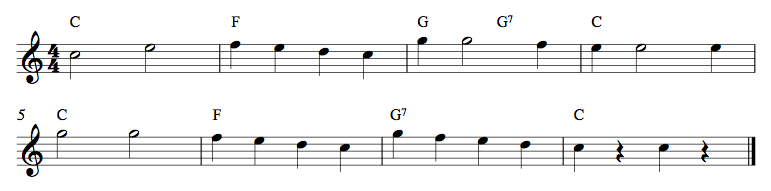
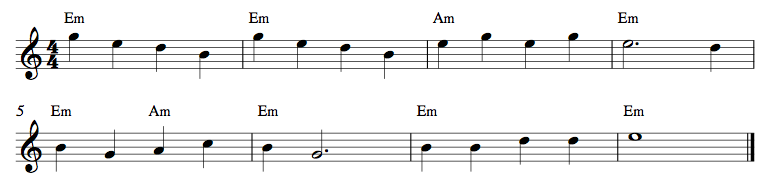
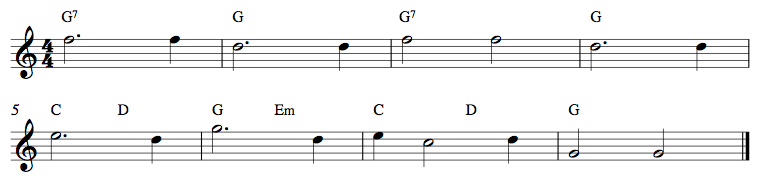
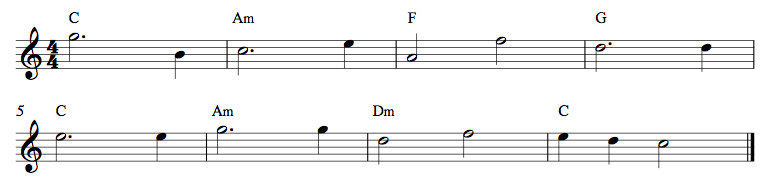
3 Strings, 8 Bars, Different Rhythms
Of course, now we are going to do some more exercises using the three strings that we have learnt in this lesson. This will also include whole notes, half notes and quarter notes. As I mentioned earlier, you should work at a pace comfortable for you. If this is your first time with this lesson and you have never read music before, you have probably been given more than enough to absorb already. Come back to the following exercises when the previous ones have been mastered.
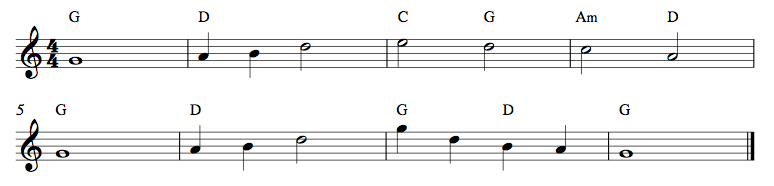
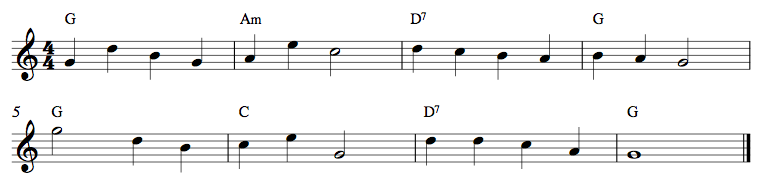
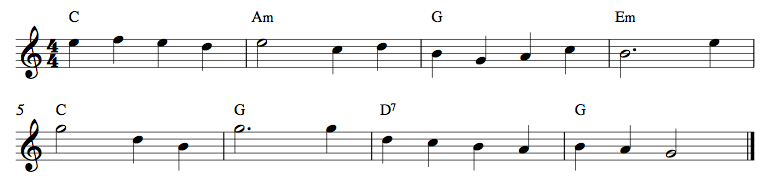
The following ten exercises are eight bars long. Now that we have three strings to work with, it is possible to play melodies that sound more like songs and less like exercises. I will introduce a few new things here. Firstly, there are chords above notes. These chords are for accompaniment purposes only. If you are playing these exercises with a teacher for example, your teacher could play the chords while you play the melody. The chord diagrams should NOT be used as a guide to which note to play. Often students observe the chord above a note and assume that it is somehow an indication of which note to play. This is not the case. Sometimes, they do match up, for example a G note might be aligned with a G chord above, but this is quite often not the case. From a note-reading perspective, you should pretend that the chord symbols are not there.
Another new addition is that for each exercise, there are now two audio files – a slow version with counting, and a faster version without counting and with another guitar providing accompaniment (chords). You should practise the exercises in the same way as with the previous exercises and test yourself by playing with the faster recordings once you are ready.
3 Strings Exercise 1
3 Strings Exercise 2
3 Strings Exercise 3
3 Strings Exercise 4

3 Strings Exercise 5

3 Strings Exercise 6
3 Strings Exercise 7
3 Strings Exercise 8

3 Strings Exercise 9
3 Strings Exercise 10
How To Practise When Learning To Read
I’ve already discussed practise techniques such as counting out loud, playing slowly, using a metronome etc, but a little more should be mentioned about learning to read. Learning to read isn’t just about understanding the system. You need to give yourself enough time to let the knowledge that you learn sink in. You probably found that the clapping exercises and the exercises using only one string were relatively easy. Most people breeze through these initial exercises. When the 2nd string is introduced, things get a little trickier. All of a sudden you can’t just rely on remembering a few notes. Even the notes that you thought you were comfortable with before, become a bit scrambled with the new notes. This just means that you need to take things slowly. Be content just to work on one exercise for a while, until you have mastered it. The next one will then seem easier.
My point is this – In the last two lessons, there has been a lot of information and a lot of exercises. Probably too much. I wanted to include it all so that you could really get stuck into reading, but even though it is spread over only two lessons (actually most of the meat is in this one), don’t expect to be able to play everything in two sittings. It may take a little more or a lot more time. Be patient and take it exercise by exercise. You should come back to this lesson and keep working at the exercises over time, until you have truly mastered them.