Bodybuilders go to the gym. Athletes train on the track. Guitarists practice technical exercises. Technical exercises are designed to improve one’s technique. What is technique? And why is it important?
Technique is often used to refer to a range of things that come under the umbrella of physically playing the instrument. Technique can sometimes refer to posture, accuracy and general ability. Technique is often associated with things such as speed, but speed is just one expression of technique. The ability to produce a particular tone can also be related to technique. While definitions may vary depending on context, you can think of technique as the physical ability to achieve a desired result on an instrument.
In this lesson we are going to learn specific technical exercises, as well as discuss what ‘good technique’ is.
Benefits of Technical Exercises
We develop technique by practising. Any time we learn new material, or refine pieces that we already know, we are improving our technique. Technical exercises exist for the sole purpose of improving technique. They are usually short exercises that can be repeated over and over and can be played at different speeds. As a beginner, technical exercises are important for a number of reasons:
- They are often short and predictable, allowing you to concentrate on the physical side of playing (as opposed to theory or memorization ability).
- Each exercise is unique and focuses on a particular technical challenge.
- They allow you to develop much needed technique right from the beginning.
- They are usually easy to learn, but can be refined and improved for years and years.
In this lesson, we are going to look at five simple technical exercises. In lesson 1 and lesson 2 of this series, you learnt the fundamentals of the guitar as well as how to read guitar tablature. Because of this, learning the technical exercises of this lesson is really a matter of reading the tabs and making sure you follow a few principles that should you should always follow when working on any technical exercise:
Memorize the Exercises
While this may seem obvious, the best thing you can do when learning any exercise is to memorize the exercise itself. This means that before long, you will be able to do away with reading the transcription of the exercise and focus on actually playing it. It’s amazing how often students rely on reading the exercise even after playing it for days or weeks, simply because they haven’t forced themselves to memorize it.
You Can’t Go Too Slow
Once you have memorized an exercise, you need to start practicing it repetitively. You should play it slow enough so that you get every note right. Your aim here is to play the exercise slow enough so that you can accurately play the correct sequence of notes, using the correct fingers. You are simply training your fingers to play the exercise and build muscle memory. Muscle memory is about training your muscles to do something even when you’re not thinking about it. When you’re driving your car and you need to stop all of a sudden, your right foot automatically moves from the accelerator to the brake pedal. You don’t have to think about it. This is muscle memory.
Work on Your Posture (technique)
Any time you practice a technical exercise, you should be aiming to improve your hand/finger posture. I use the word posture deliberately as opposed to ‘technique’ (which is often used in its place) because as I mentioned earlier, technique can often refer to a range of different things. Good overall posture means sitting up straight and being relaxed, which is important, but hand and finger posture is something that usually requires a lot of focus and conditioning. The posture of your hands/fingers is especially worth mentioning, because in the early months of playing guitar, you will feel like you don’t have full control over your fingers. Specifically, when playing one note, usually the fingers that aren’t being used are hardest to control. Often, when playing one note with one finger, the other fingers tense up and contort. What should your left hand/fingers look like when playing? A good rule of thumb (pun intended) is that your fingers should remain close to the fretboard even when not playing a note. One way to demonstrate this is to place each of your fingers on adjacent frets, all on the one string.
In the image below, all four fingers are on the 1st string, on adjacent frets, starting from the 5th fret:

Notice that each finger is curved, but the tip of each finger is pushing the strings directly into the fretboard. This is a useful image to observe and also to replicate. It is a good example of what ‘good technique’ looks like. Of course, when we play individual notes, we usually only push down with one finger, on the note that we want to play. However, the thing to keep in mind is that when playing one individual note (with one finger) the fingers that are not being used should not move too far from the posture in the above image. The fingers that are not being used should hover only about one centimetre away from the above starting point.

This is the goal with your hand/finger posture, when playing technical exercises (or anything else for that matter). You should aim to keep each finger close by. When in doubt, place all fingers on adjacent frets (just like the first image) and use that as a reference point. Keep in mind that this is very challenging and in reality, it’s not something that you just ‘get right’ from the start. It is something that you need to keep improving upon. In the beginning, it is very common for the fingers that aren’t playing a note to tense-up and move away from the fretboard, like this:

Think Tone/Clarity
One of the most overlooked but important qualities to aim for when practising technical exercises is tone and clarity. A common mistake for beginners is to learn an exercise and then convince themselves that they are improving greatly by increasing the speed, without improving the tone/clarity. This is a good example of how speed is just one expression of technical achievement, but should not be valued higher than things such as tone and clarity. When you practise technical exercises, you should aim to achieve a good consistency from one note to another. Here are two examples of the same exercise being played. In the first example, the exercise is played with poor tone/clarity. In the second example, the exercise is played with good tone/clarity.
How do you achieve good tone/clarity? Always use your ears. Music is an aural experience. Everything else is a means to this end. You should be constantly listening to whatever you are playing and adjusting. This is another reason why practising slowly is important. When you play slowly, you can really hear the sound of each note. You can’t hide behind the next note!
Use A Metronome
A metronome is one of the most fundamental and important practice tools that you will ever use. A metronome is something that keeps a regular beat (like the ticking of a clock). Practising with a metronome is vital for developing a strong sense of timing and rhythm. It is like having a portable drummer.

Years ago, metronomes were mechanical devices that had physical moving parts. Then along came the digital revolution and it was possible to buy digital metronomes that were much more reliable and easy to use. These days, there is an abundance of apps and software that have a variety of features. Many are free, which means that if you have a smart phone, you can easily obtain a metronome in a few seconds. While the features and capabilities of metronomes can be quite extensive, all you need is something that can be programmed to produce a simple, repetitive beat. You also need to be able to program the tempo (speed) of the beat.
Playing in time with a metronome requires practice, which means that everytime you play something with a metronome you are essentially working on two things – The piece of music that you are practising and the general skill of playing in time. Because we are yet to discuss rhythm in great detail (we will in an upcoming lesson), the rhythms used in the following exercises will be very simple. This means that for all the exercises, you just need to play one note for every ‘click’ of the metronome. This should make more sense when you listen to the example audio files. If in doubt, I recommend learning an exercise (memorize, play slowly) and then once it feels familiar to you, listen again to the audio file and observe how the exercise fits in with the click (metronome).
Relax
It is important to always be relaxed when playing anything on the guitar. It is difficult to instruct someone on how to be relaxed. It is an issue that relates to muscles and posture, but also to psychology. The simplest advice I can give is to be aware of tension and constantly remind yourself to relax. Muscles develop by practising with proper technique over time. Repetitive Strain Injury (RSI) is something that many people struggle with due to tension and bad posture when playing. I’m not an expert on such matters and I don’t want to give unqualified advice, but there has been a lot of research done in the field of posture and ‘correct playing’ for musicians. If you’re interested, do some research on the ‘Alexander Technique’.
Notes and Tabs Together
In the previous lesson, we discussed the difference between standard notation and guitar tablature and how they are sometimes used together. The following exercises are notated in both standard music notation and guitar tablature. If you are a beginner, it will most likely be easier for you to follow the tabs. Remember, whenever you see standard notation and tablature together, they are both transcriptions of the same thing. You only need to read one of them (although you can read both if it helps).
Left Hand Fingering
The left hand fingering for each note of each exercise is annotated above the standard notation. Although you probably won’t be reading the standard notation (you will be using the tablature), it is important to observe the fingering for each note. Each finger marking is aligned vertically to the tablature note that it applies to, so all you need to do is scroll up with your eyes!
Picking Directions
It is a good idea to master each exercise using only downstrokes (with your pick) to begin with. Upstrokes are a very important and necessary technique, but you need to get comfortable with downstrokes before attempting upstrokes. Of course, once you are comfortable with each exercise using downstrokes, practice playing the exercise by using alternate picking. Alternate picking is as simple as this:
1st note = downstroke
2nd note = upstroke
3rd note = downstroke
4th note = upstroke
5th note = downstroke
etc.
The critical thing is to alternate constantly between the two strokes from one note to the next. Never do two of the same strokes in a row (unless doing all downstrokes). There are situations where repeated strokes are favourable, but for now, stick to either all downstrokes or alternate between downs and ups.
Repeat, Repeat, Repeat!
Whenever you practise a technical exercise, you should repeat it continuously (also known as ‘looping’). When you repeat an exercise, there is no break in between the last bar of the exercise and the first bar (of the repeat) – the rhythm must be continuous. For an example, listen to the audio recordings for each of the following exercises. Each exercise is played four times, so you can hear how repeats work. Of course, you can (and should) repeat more than four times.
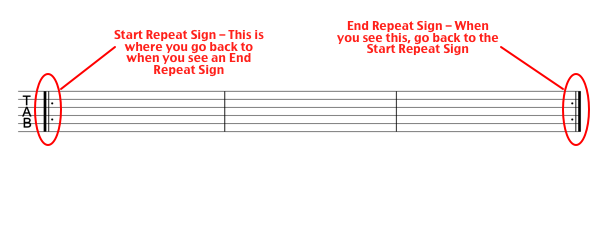
Repeats are usually indicated by signs. Observe the following diagram with explanations:
Increase Speed Gradually
Once you can comfortably play an exercise with accuracy, clarity and ease, increase the tempo (using a metronome of course) and practise the exercise at the new tempo. Usually, with an increase in tempo, challenges present themselves. You might find that you are tensing up, or that your tone is suffering. Be patient and give yourself time to master the exercise at the new tempo. Once you have mastered the new tempo, increase it slightly and repeat the process. Although speed is just one element of technique, the ability to play fast is often associated with ‘having good technique’. It’s natural to want to be able to play faster. We all do, but be patient.
The Exercises
The following are a few technical exercises that you should work on. Feel free to play all of them, or just a few. You can always come back to this lesson and learn others when you are ready. Each exercise is played four times at 100bpm (BPM stands for ‘Beats Per Minute’ and is the standard way of measuring speed on a metronome).
Exercise 1 – Chromatic
This is a very standard and popular exercise. It is a simple and predictable exercise that uses each finger on the left hand and requires playing on each string. This is the first exercise that many guitarists learn.
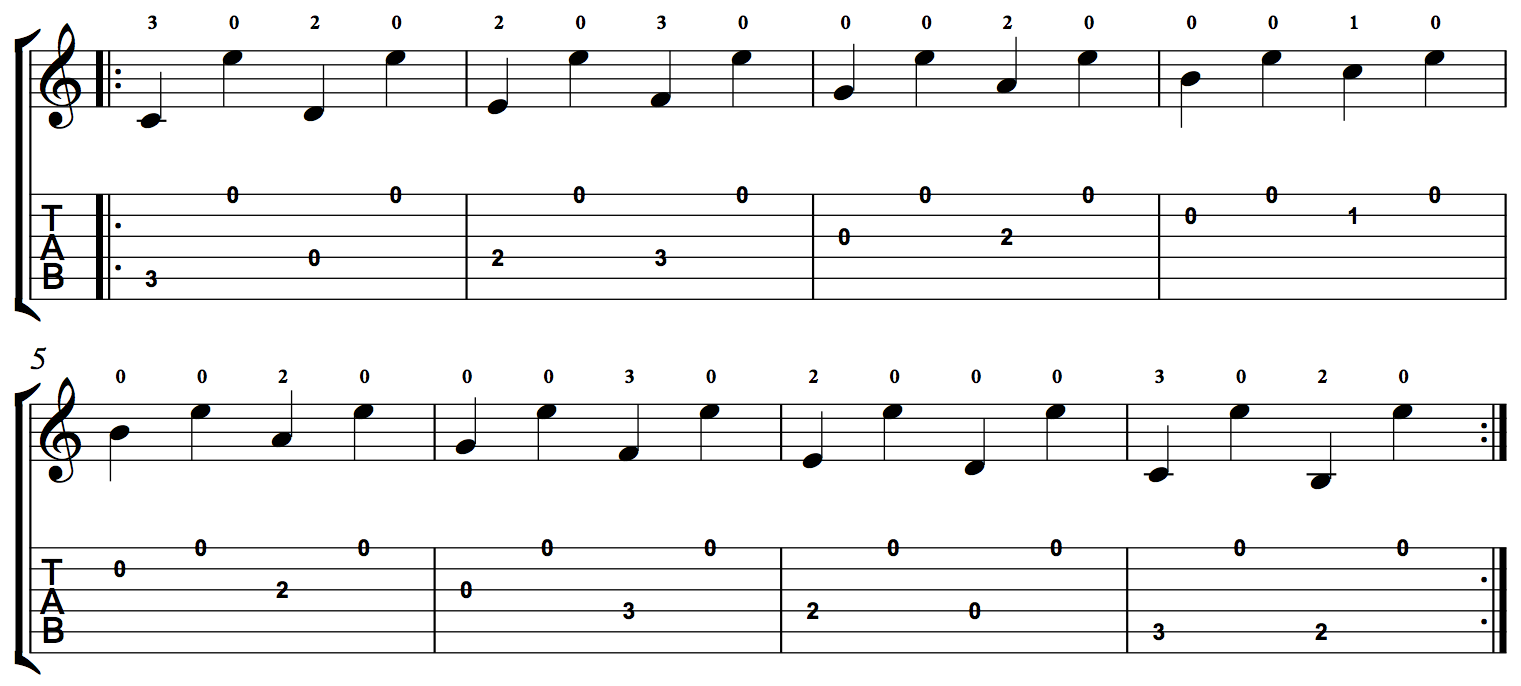
Exercise 2 – C Major Scale

This exercise is based on a C Major scale. Scales are an important tool for all musicians (we’ll look at them in more depth in another lesson). This exercise will probably sound familiar to you in a way. Even if you’re not specifically familiar with the concept of scales, you have probably heard this scale, or variations of it many times before.
Exercise 3 – String Skipping
This exercise is also based on the C Major scale, but it is a variation. It requires ‘skipping’ to the 1st string (E string) after each note of the scale. It is significantly harder than the previous exercise and a great exercise to practise for developing picking accuracy.
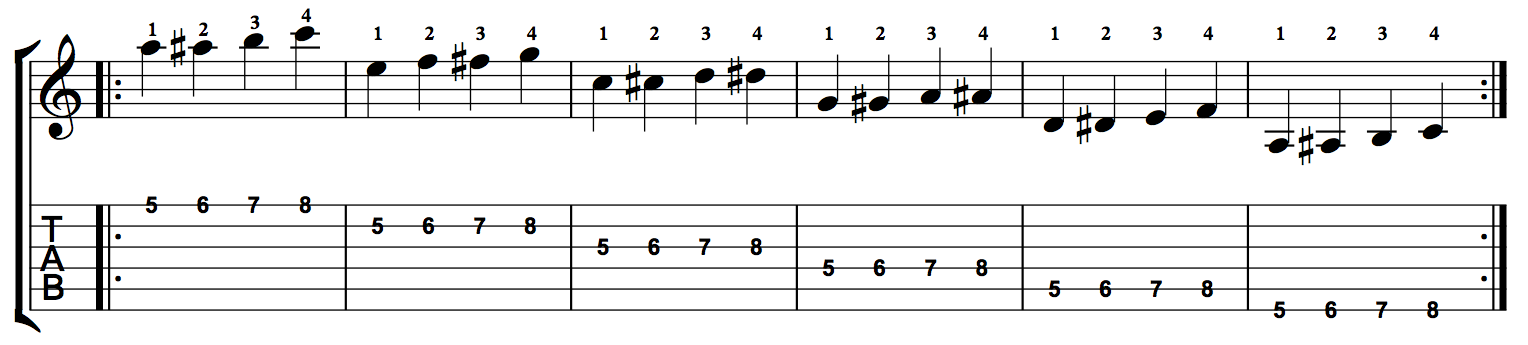
Exercise 4 – 1 String

This exercise is played entirely on the first string and moves up and down the fretboard. Be sure to observe the left hand fingering. This is an especially good exercise for practising alternating down and up strokes, because it is played on one string only.
Exercise 5 – Position Changing

This exercise involves changing positions (on the fretboard) while also changing strings. This is quite a challenging exercise. Make sure you pay attention to the left hand fingering. This exercise is also less predictable than the others, so you may need to spend a bit more time memorizing this one.
Practise These Forever and Learn More
The great thing about technical exercises is that you can practise them forever and theoretically always have room to improve. There are always improvements that can be made in regards to clarity, economy of movement and of course, speed. They are also great warm-up tools. Playing guitar is a physical exercise and requires being ‘warmed-up’, just like any other physical activity. If you play some of these exercises for 10 minutes before a performance (or practice session, or lesson etc), you will be physically warmed up and mentally focused. There are always more exercises to learn and each new exercise will have a unique technical challenge that will help you to develop your technique further. There will be another more difficult lesson down the track on technical exercises, which will include some new techniques. For now, practise these exercises and keep on improving.