You’ve probably heard someone tell you, learn three chords and you can play a thousand songs. Is it true? Well… it’s probably more like a million songs. Even that would be underestimating it.
The power of chords is in how often the same ones are used. Chords are often the canvas on which entire songs are built. In much the same way that one single riff can be used repetitively throughout a whole song, using just a few chords can give you the same effect. The difference with chords however is that we use the same chords over and over again in different songs. Thousands of songs use the same chords.
What Exactly are Chords?
You already know what a note is and how to play one. A chord is simply three or more notes played together, in unison. We give names to different combinations of these notes and we use these names to identify with and communicate chords. For example, I could play a song that uses ‘D Major‘ and ‘A minor’ in the verse and goes to ‘G Major’ in the chorus. There is a fair amount of theory relating to how chords are constructed and how we assign labels to different chords, but the good news is you don’t need to worry about any of that for now. All you will really need to understand as a beginner, is that chords are formed by playing multiple notes in unison and we give different combinations labels.
Audio Examples
What we are going to do now is listen to some audio examples of chords with a bit of context. We are not going to do any playing yet. The purpose is just to demonstrate what chords sound like at a basic level and also how we can use just a few chords to produce music. Don’t worry about trying to understand all the terminology just yet. For now, just listen to the examples and try to get a general feel for how they are being used.
D Major Chord
The following example is of a D Major chord being strummed once:
A Major Chord
The following example is of an A Major chord being strummed once:
D Major Chord (Strumming)
The following example is of the D Major chord that we heard before, but this time it is being strummed rhythmically:
D And A (Strumming)
In the next example, you will hear the D Major and A Major chords being used in a strumming context, moving from one to the next. This is known as a chord progression:
D And A With a Melody
The next example uses the same chord progression as the last example, but there is another guitar part playing a melody over the top. This demonstrates how chords can be used as the canvas to build something upon:
D and A With Different Melody and Feel
The next example uses the same two chords as before, but this time the rhythm is different and the melody being played by the other guitar is also different. Observe how the same two chords can be used in a different context to create a totally different piece of music:
As you can hear from the examples, with only a few chords, the possibilitis are endless. Of course, in the last two examples, there was another guitar part playing a melody. But this just underlines why chords are so useful. Most of the time, they provide the ‘backing’, or ‘harmony’, or ‘rhythm guitar’ as opposed to the ‘lead guitar’ or melody etc. When we learn to play the chords to a Beatles song (for example), we’re really only learning one part of the song, but we are still, none the less, learning to play the song (even if it is only the chords).
How to Read Chord Diagrams
The aim of this lesson is to introduce (or reintroduce) you to the concept of chords, explain why they’re so great and how to play them. Learning individual chords in the first place usually involves reading chord diagrams. Chord diagrams, as the name suggests, are illustrations of individual chords, indicating where certain fingers should go (which string, which fret). Chord diagrams look easy. In a sense, they are. However, they are often misinterpreted and it is worth looking at them in detail and discussing a fool-proof way of getting them right every single time. Let’s look the D Major Chord.

Above is a typical chord diagram, in this case for a ‘D Major Chord’. It is a diagram that displays strings, frets and fingers. The circles with numbers inside them indicate specific fingers. A circle with a ‘1’ represents the 1st finger, a circle with a ‘2’ represents the 2nd finger etc. The strings are the vertical lines. From left to right, the string numbers go from 6 to 1. The frets are the horizontal lines.

Got all that? Maybe? Let’s look at the same diagram, but this time with annotations:
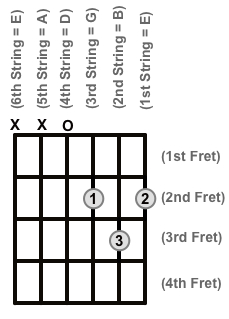
It’s very easy to see what is what when the annotations are there. Of course, the annotations are usually not there, which is why you need to memorize the format. It’s a pretty easy format to memorize, as there is not much to it, but students often get things around the wrong way. So make sure you remember which lines represent frets, which lines represent strings, and the order.
What to do With the Diagram
Now that you understand what the different things mean on the diagram, you need to know how to interpret them. You have probably already figured out that when you see a circle with a number in it, you put that finger on the fret that it is aligned with, and on the string that it is aligned with.
Therefore, in the original example, we can see that to play a D major chord, we need to do the following:
- 1st finger goes on the 3rd string (G) and the 2nd fret.
- 2nd finger goes on the 1st string (E) and the 2nd fret.
- 3rd finger goes on the 2nd string (B) and the 3rd fret.
This should look like this:

The only other thing we need to know is which strings to strum. Strumming involves striking all of the strings that make up the chord, with our right hand. In the first two audio examples (of the D Major and A Major chord), you heard each chord being ‘strummed’ once. So which strings do we strum? If a string has a circled number on it (representing a finger) then it’s obvious that we strum that string. For the strings however that do not have a finger assigned, we need to know whether we strike them as well, or miss them. This is indicated by the following:
- O = Play
- X = Don’t Play
As I mentioned, chord diagrams are not difficult to read, but people often make interpretational mistakes, especially in the early stages of playing chords. The reason why is because of the temptation to look at the overall shape of the chord and try to mimic or mirror it. Once you have a good amount of experience reading chord diagrams, you will be able to form chords instinctively by looking at diagrams, but for now, you should use the ‘3 Questions Method’…
Introducing The 3 Questions Method
The 3 questions method is a fool proof way of making sure that you form chords correctly. All it requires is that for each circle with a number in it, you ask the following 3 questions:
- Which finger is it?
- Which string is it?
- Which fret is it?
This might seem too obvious of a process to give a label to, but by literally asking yourself those three questions (do it out loud!) for each circle, you can’t go wrong. Let’s do an example. Let’s look at the ‘A Major’ chord:
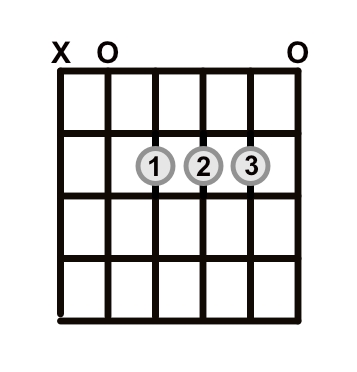
Let’s start with the circle with the ‘1’ inside it:
Which finger is it?
1st finger.
Which string is it?
4th string.
Which fret is it?
2nd fret.
Therefore, place your 1st finger on the 4th string, on the 2nd fret.
While keeping our first finger where it is, let’s look at the circle with the 2 inside it.
Which finger is it?
2nd finger.
Which string is it?
3rd string.
Which fret is it?
2nd fret.
Therefore, place your 2nd finger on the 3rd string, on the 2nd fret.
While keeping our first two fingers where they are, let’s look at the final circle, with the 3 inside it:
Which finger is it?
3rd finger.
Which string is it?
2nd string.
Which fret is it?
2nd fret.
Therefore, place your 3rd finger on the 2nd string, on the 2nd fret.
If you have followed the above instructions, you should now be forming an A Major chord, which should look like this:
The 6th string has a cross next to it, which tells us not to play it. The other five strings either have a finger assigned to them or have an ‘O’ next to it (telling us to play that string open), so all we have to do now is strum the five strings from the 5th to the 1st.
That might seem like a pretty drawn out process, for something that you might be able to achieve by simply looking at the diagram and mirroring the shape, but it’s important to focus on accuracy in these early stages. It really doesn’t take that long to do this process once you know how.
Memorize The Shapes!
The only reason why chord diagrams exist, is to communicate how to play a particular chord. Whenever you read a new chord, your first goal should be to memorize it. There are technically thousands of different chords and variations, but in reality, we use only a handful (pun intended) most of the time. Therefore, when you learn a D chord (for example), your goal should be to memorize it as soon as possible and only refer back to the chord diagram if you forget how to play the chord or need further clarification.
Too often, students rely on chord diagrams every time they play a song with chords, even if they have used those exact chords before. In short, interpret the diagram, then memorize the chord, so that you can spend your time practising, not reading.
What Are ‘Open Chords’?
Open chords are chords that contain open strings (like the examples we have already done in this lesson). The open strings create a certain resonance. There are other types of chords, such as bar chords, which are significantly harder, but as a beginner, it’s a good idea to focus on open chords until you have mastered them.
Chord Labels
An ‘open chord’ or ‘bar chord’ really just refers to the way in which we play a chord. These are labels that are specific to the guitar. A pianist, for example probably wouldn’t know what you meant by the term ‘open chords’. There are however, different types of chords, from a music theory perspective, and there are names for each of these types of chords that we use to identify and label them. It is not necessary to understand the theory at this stage. For now, just know that there are different types of chords and each type has a unique sound, or ‘colour’. In today’s lesson, we are going to look at three different chord types. These are the three chord types that you will encounter most of the time.
Major Chords
The major chord is the most common chord. It is also the default chord type. In the above example, when we played the ‘D Major’ chord, we were actually playing a ‘D’ chord. We don’t have to specify that it is a major chord, because it is the default chord type. We can if we want to, but most of the time, you will just see it written as ‘D’. When we play a ‘C’ chord, we are actually playing a ‘C Major’ chord, and so on and so forth. You can think of major chords as having a bright, happy sound.
Minor Chords
The minor chord is usually represented by a lower case ‘m’, such as ‘Dm’ (D minor) or ‘Em’ (E minor). It can also be written as a dash, for example ‘A-’ (A minor). Minor chords generally have a melancholy, or dark sound.
Dominant 7 Chords
Dominant 7 chords are usually shortened to just a ‘7’, such as ‘D7’ (D dominant 7) or ‘B7’ (B dominant 7). The dominant 7 chord has a very bright sound.
Listen to these three different chords (D major, D minor and D dominant 7) and compare the sounds and moods. If you want to play them, consult the chord diagrams after the next paragraph.
D Major
D min
D7
15 Open Chords
There are 15 main open chords that you should set a goal of learning. If you know three chords, you can play thousands of songs. If you know 15, that number is obviously exponentially higher. There are many other open chords, but you will see these ones much more frequently than the others. Here are the 15 open chords, in alphabetical order:


A Few Things About Technique
Before you go crazy learning as many chords as you can, it’s worth mentioning a few things about technique. In general, good technique with regards to chord playing is very much the same as with technique in general (as discussed in the previous lesson). Good finger posture is important, position of fingers on frets etc. The thing that is unique with playing chords, is that most of the time, it involves fingering more than one note at the same time, which can make things harder than playing just one single note. Here are a few things to look out for:
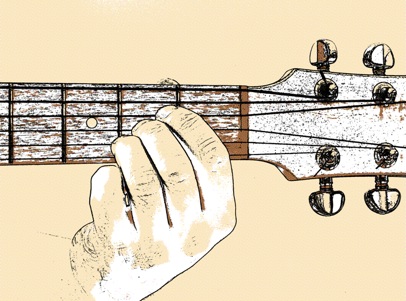
Banana Fingers
It’s important to make sure that your fingers don’t tense up and become ‘banana fingers’. As seen in the image below, this is when your fingers basically tense up and bend the wrong way. You want to keep your fingers nice and rounded, with the tip pushing into the string. Observe the images below to see a good and bad example.


Droopy Fingers
You should use the point of your fingers (on the fleshy bit) to play each of the notes of the chords. This should result in your fingers being nice and ‘rounded’, like the image below. If your finger posture is a bit lazy, your fingers will ‘droop’. The problem with droopy fingers is that it results in notes being cut off, because of interference from other fingers. Again, see image below.

Practising Chords
The following are some tips on how to practise chords:
Arpeggiate Chords
Arpeggiating chords simply involves forming a chord, and then playing each string of the chord, one by one. What this does is allow you to hear which notes of the chord are clear, and which ones are weak (because of technical issues).
Often, when we are practising chords, our instinct is to strum them. The problem with just using strums from a practice perspective is that the good notes can mask bad notes. Because there are multiple notes being sounded, any ‘dud’ notes can go undetected, especially to the inexperienced player.
By arpeggiating the chord, you can very easily tell which notes are clear and which ones aren’t. When doing this exercise, it’s important to allow the previous notes to keep ringing out, as you play the next ones, because when you eventually strum the chord, all the notes need to be ringing at once. Here are two audio examples of the E Major chord being arpeggiated. The first demonstrates the chord being played without perfect clarity. The second demonstrates how it should sound:
Bad
Good
You will probably find that to begin with, your chords are not perfectly clear. Don’t stress. Most people develop clarity and strength with chords over a period of weeks or even months. Your fingers need the chance to develop strength and technique, and you achieve that with regular practice, while focusing on the techniques that we have already discussed. Don’t get disheartened if the chords sound weak to begin with. Remind yourself that just by trying, you are strengthening your hands and gradually improving your technique.
Change From One Chord To The Next
In this lesson, we have discussed the concept of chords – how they’re used, how to read them and some practice techniques. We’re not going to play any songs in this lesson, but the best thing you can do, in preparation for using chords in songs, is to practise moving from one chord to the next. Don’t worry for now about strumming a particular rhythm or sticking to a certain speed. Simply memorize three chords (for now) and practice strumming one chord once, then moving to the next, then strumming that one, then moving to another etc.
I recommend focusing on the chords A, D and E, as they will be the first chords that we use in a musical context (in the next lesson).