
If you’ve never used the fingerstyle technique before, you’re missing out. A lot of guitarists decide early on when learning, whether they’ll be a ‘picking guitarist’ or a ‘fingerpicking guitarist’. The truth is, you don’t have to limit yourself to one or the other. Both techniques have unique benefits and advantages and you can easily develop both of them at the same time.
Pick Vs Fingerpicking?
So what is fingerpicking? Well firstly, most guitarists play the guitar by using a pick. It’s pretty simple – the right hand (assuming we’re talking about a right-handed guitarist) holds a pick and every note is played with a stroke of the pick. Fingerpicking, on the other hand does away with the pick and uses the right-hand thumb as well as three fingers, to strike the strings.
The differences between the two approaches is pretty obvious. With a pick, you can only play one note at a time (unless your striking adjacent strings, for example strumming). There is a certain precision, attack and percussive nuance that is associated with using a pick, which is why most rock/pop/blues/metal/funk guitarists use a pick. It’s the modern way to play the guitar.
Fingerpicking on the other hand (pun?) allows you to play multiple notes at once, because you can use your thumb and any combination of your first three fingers (we’ll get to that later). There is generally a softer, more subtle tone that is produced by using fingers. It also opens up unique possibilities, such as playing a bass line with your thumb, while playing a melody with your fingers. Fingerpicking is used extensively with classical guitar, certain blues styles and folk.
Although both approaches are associated with certain styles, in reality, both can be (and are) used in any style you want. To really experience the best the guitar has to offer, I believe you should learn to play with a pick and also with your fingers.
Using Your Fingers
When we play the guitar with our fingers, we use our thumb and first three fingers.
We don’t really use our pinky finger, because it’s so much shorter than the others. When we read music, each finger (and thumb) is represented by a letter.
- thumb = p
- index = i
- middle = m
- ring = a

These letters come from Spanish words, but are still used as the convention for annotating right-hand finger markings.
Right-Hand Posture
The first thing we need to do when playing fingerstyle guitar, is to make sure our right hand is positioned correctly. Observe the following two images:


Try to mimic the position of the hand in the above images. As you can see, the hand kind of hovers over the strings in a relaxed manner. There is a very subtle arch of the wrist, and the thumb sits in front of the fingers.
When we strike the strings, our thumb moves in a downwards motion, like the pick does when playing a down stroke. This is why it’s important that the thumb sits in front of the fingers, so it has full range of movement. When we use our fingers (index, middle or ring) the fingers strike the strings in an upwards motion. The finger (being used) should move towards the palm of your hand to strike the string and then return to its starting position.
You should avoid moving your wrist with each execution of a note. The movement should come from the thumb and fingers. Of course, this can be hard to achieve when starting out, and it’s also worth noting that communicating proper technique effectively in a blog can be challenging. But if you follow these basic guidelines, your practice and development will be much more effective.
Basic Exercise
We’re going to look at some exercises by a famous Italian composer shortly. But before we do, let’s look at a simple, introductory exercise.

The above exercise uses the open C chord on the left hand (see the chord diagram above). The left hand does not change for the duration of the exercise. You simply hold that chord and then execute a right-hand finger pattern.
Now observe the exercise itself. You can read either the standard notation or the tablature (both tell you how to do the same thing). The important thing to follow (apart from the notes) is the right hand fingering (using p, i, m, a). The right-hand fingering is written along side each note (standard notation), but if you’re reading tablature you can simply see which note of the standard notation line is aligned with each tablature note.
Play the exercise.
It should sound like this:
What should be happening is that your thumb and fingers are basically taking turns in playing notes as you go through each note in the exercise. It’s like each string of the guitar has a finger/thumb assigned to it and whenever that string needs to be played, the corresponding finger does its job.
This is typical of how finger picking works. Often, each finger rests above a certain string and strikes that string when it needs to be played. The thumb tends to move around more than the fingers, as it is often responsible for the bass notes, which are usually played on the 4th, 5th and 6th strings. This is definitely not a rule. Once you start playing fingerstyle guitar, you will see that fingers change between strings and different combinations are used at different times. However, it’s a good approach to think of each finger as having a string that it is most responsible for and using this as a starting point.
Mauro Giuliani
We’re going to look at some finger exercises by the famous Italian composer, Mauro Giuliani. Giuliani was a guitarist born in 1781. He composed prolifically for the guitar. He wrote a book called 120 Right-Hand Exercises, which has become a classic book for guitarists for hundreds of years.

Each of the 120 exercises is a two-bar exercise, involving one chord in the first bar and another chord in the second bar. The chords don’t change from one exercise to the next. The left hand does exactly the same thing throughout each of the exercises. What does change is the right hand. Each exercise uses a unique pattern with the right hand, which is usually a subtle variation on the previous exercise. It means that after 120 exercises, many different combinations and unique technical challenges have been covered.
150 Exercises
I have taken Giuliani’s book and modified, edited and expanded on it slightly. Firstly, I have added tablature, so that the exercises can be read using standard notation, as well as with tablature. I have also changed the chords that are being played with the left hand for each exercise. In the original exercises, the chords used were C Major for the first bar and G7 for the second bar. With my modifications, A minor is played for the first bar, while E is played for the second bar. I believe these chord changes are easier, therefor allowing more focus to remain on the right hand.
I have also added additional exercises, so that there is a bit more variety. We’ll get to these extra exercises shortly, but first, let’s look at the Giuliani exercises.
5 Giuliani Exercises
To play these five exercises, you will need the following two chords.


The first bar of each exercise involves playing A minor for the first bar and E Major for the second bar. Observe the diagram below.
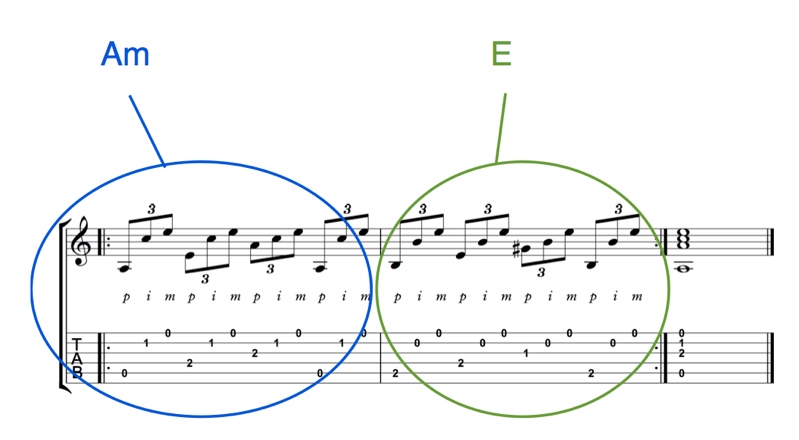
With each exercise, the left hand is predictable. What changes is the right hand. Let’s look at the first exercise.
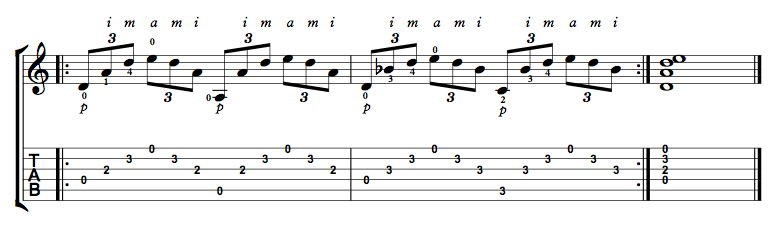
Exercise 1
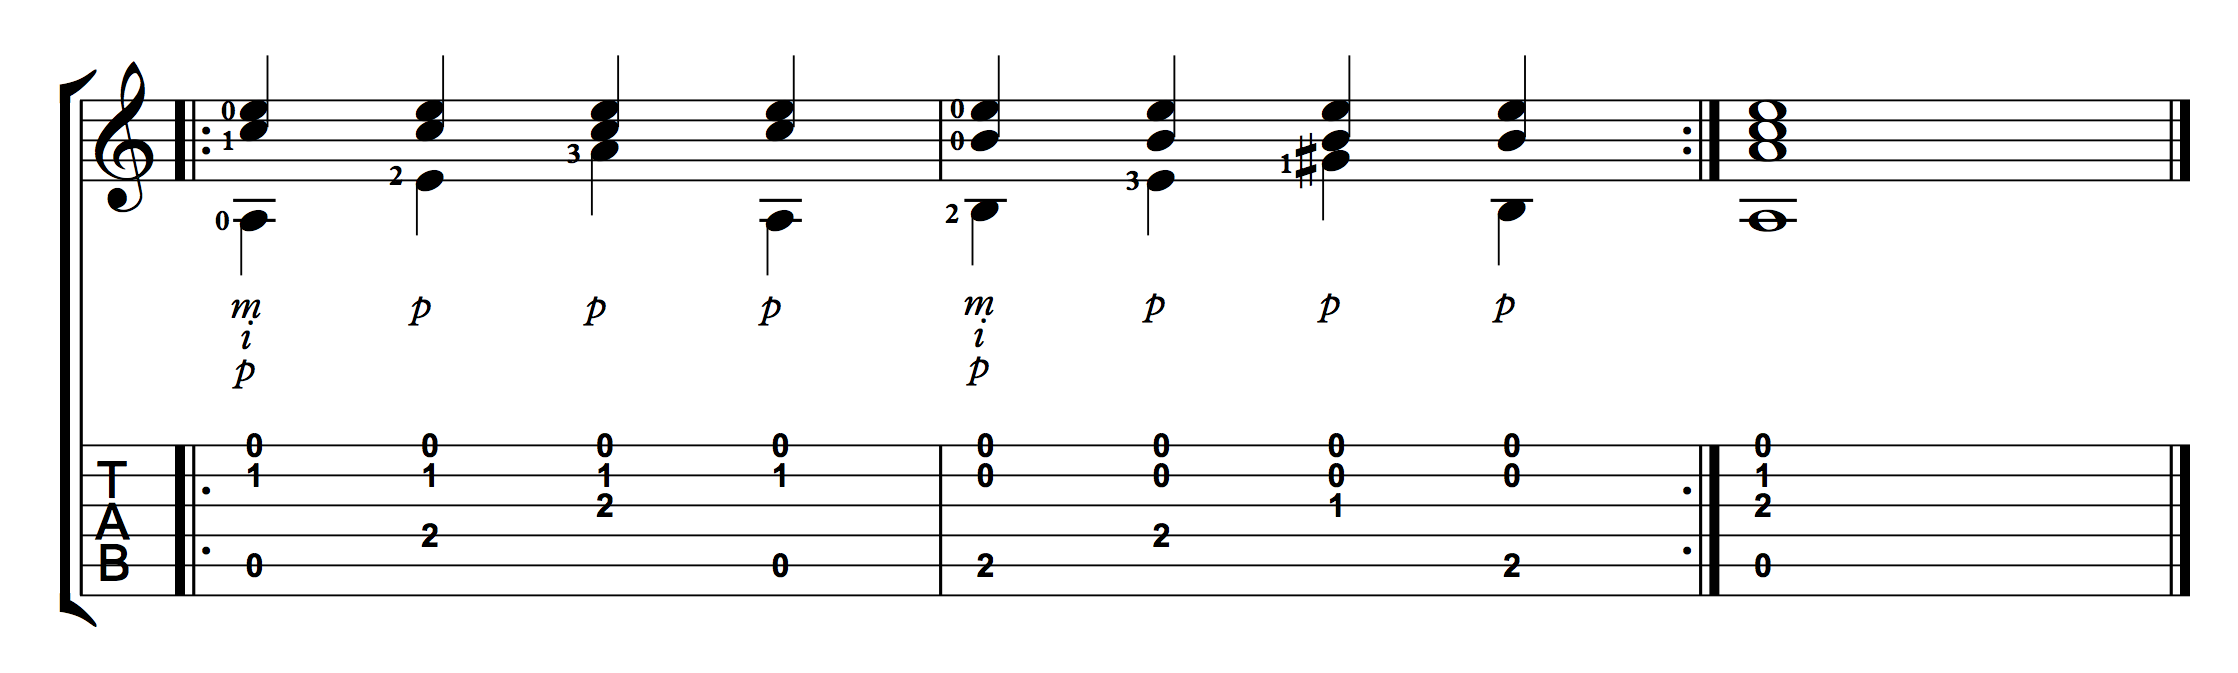
Exercise 1 is actually more of an introductory exercise, because it involves playing multiple notes at once. Most of the exercises in the book involve single note patterns (but not always). The purpose of this first exercise is to introduce you to the chord pattern that is used throughout, and to demonstrate how the index and middle fingers often repeat the same strings, while the thumb moves.
The right hand fingering has been printed in the space in between the standard notation and the guitar tablature. This is different from where fingering traditionally appears (next to the notation), such as in the exercise that used only the C chord, but it is a cleaner, more modern way. By placing the fingering in this space, it is obviously aligned to each note, even when there are multiple notes played at the one time.
Have a go at playing the exercise yourself. Remember, the thumb essentially plays a down stroke, while the other fingers move up towards the palm of the hand. Make sure your posture is proper.
It should sound like this.
Note: The book does not come with any audio files. These audio files have been created for the purpose of this lesson, but the book itself does not come with audio. Not that you need it, once you understand how the exercises work, you can hear what they sound like just by playing them.
The exercises aren’t necessarily hard, although some might be challenging, especially as you move through the book. Often, the purpose of technical exercises is to allow you to repetitively work on something simple, so as to refine your technique, without necessarily having to develop completely new technical abilities. Still, if you’ve never used the fingerpicking technique before, these exercises might be a new challenge for your, where you’re developing a new technique from scratch. Either way, simplicity and repetition is the best way to go.
Although these exercises are only two bars each (not including the finishing chord), you should practise looping them over and over again. The recordings in this lesson only play each exercise twice and then finish, but when practising, you should play each exercise repetitively, in a loop.
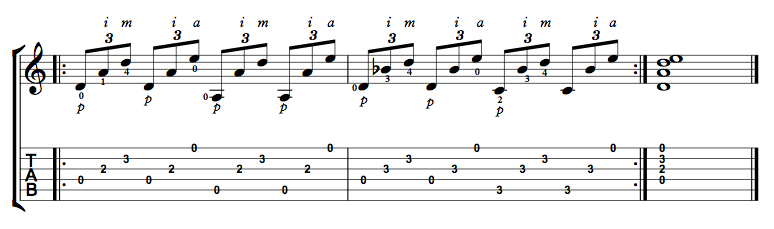
Exercise 2
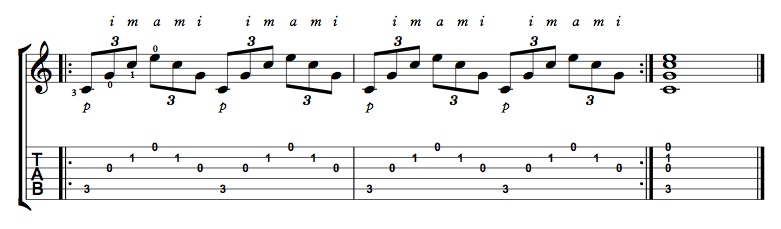
Let’s look at exercise 2. Exercise 2 uses the same two chords, but now each note is played individually. Observe the exercise and audio example.

This exercise is more typical of the majority of the exercises, because it involves playing individual notes with the right hand, that form a pattern. Let’s look at exercise 3.
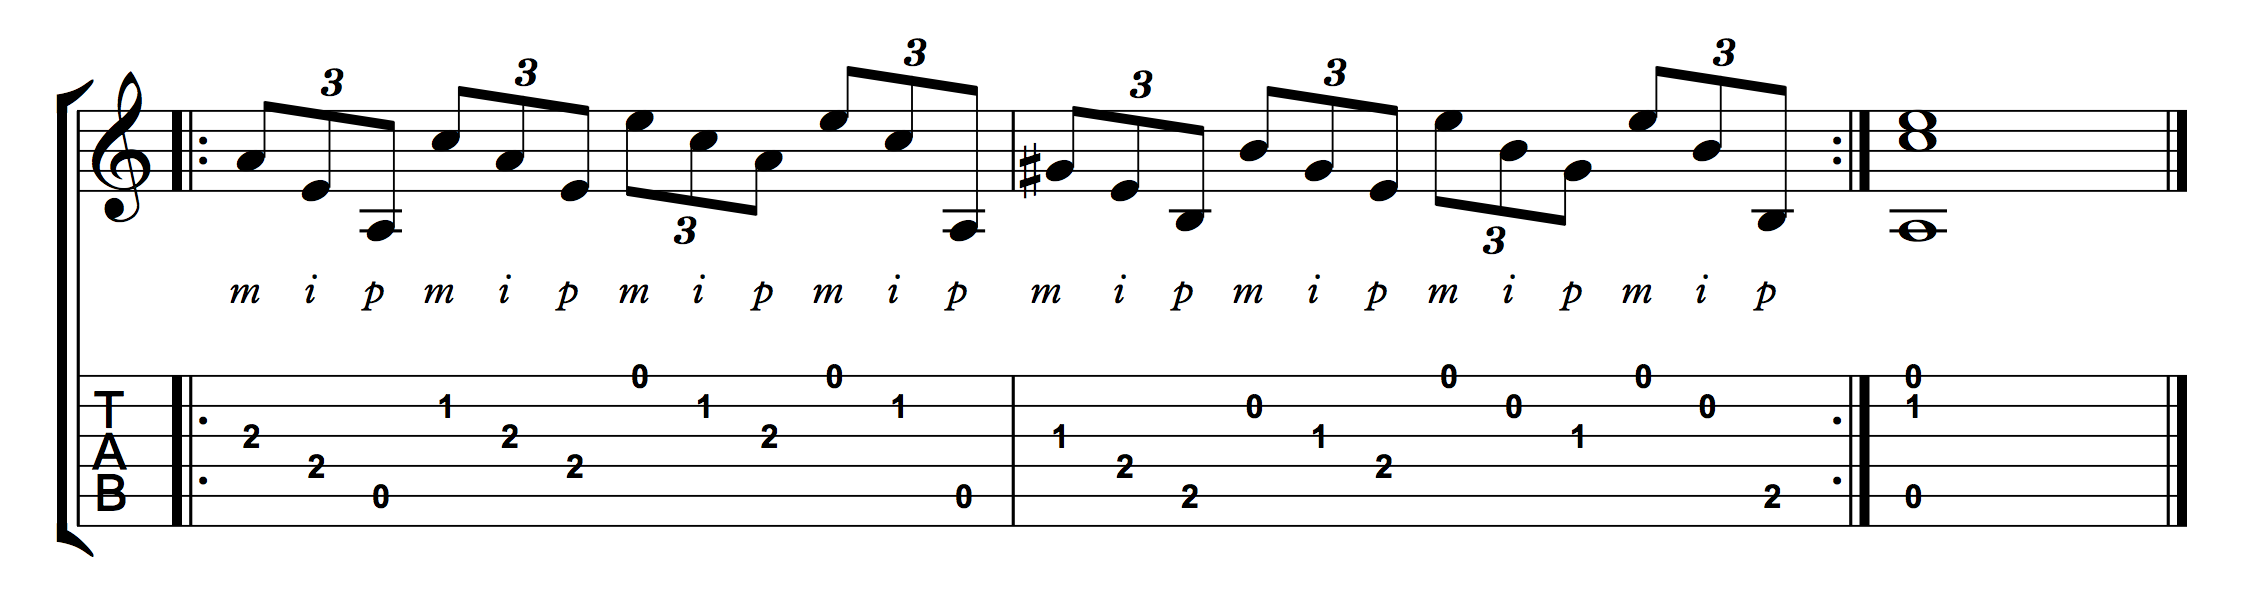
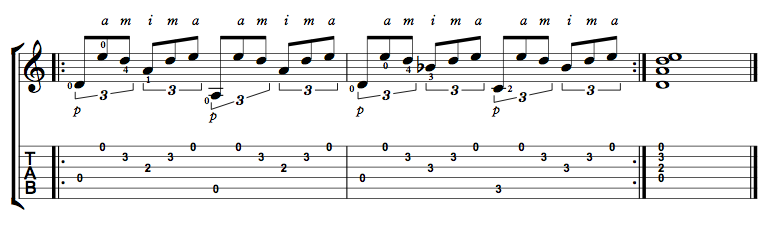
Exercise 3

As you can see (and hear), this exercise is very similar to exercise 2, but is a slight variation. Let’s look at the next two exercises.
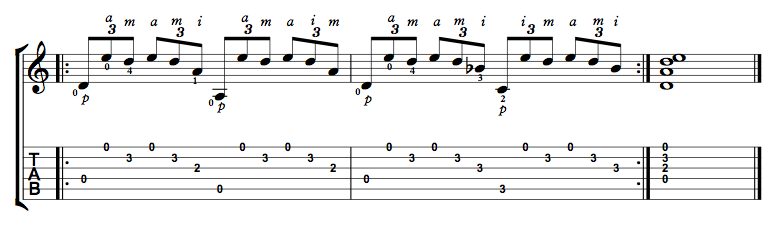
Exercise 4

Exercise 5
By now, the structure of the exercises/book should be pretty obvious. Each exercise has a unique right-hand variation, while the left hand pretty much does the same thing. This means that over course of 120 exercises, you are encountering many different technical challenges and variations, which is a great way of developing your right-hand technique.
Additional Exercises
As well as the 120 exercises composed by Giuliani, there are also an additional 30 exercises added to this edition of the book. The main difference with these additional exercises is that they use different chords. The use of different chords give the exercises a different feel and are more modern sounding than the original exercises. The exercises still involve playing one chord for the first bar and another chord for the next bar, but each two-chord combination is used for only five exercises, then a new two-chord combination is used for the next five and so on.
We’re now going to look at the first five of these additional exercises. As I mentioned, each set of five exercises uses a different combination of two chords. Here are the chords you need for these five exercises.
Chord 1

Chord 2

Exercise 121
Exercise 122
Exercise 123
Exercise 124
Exercise 125

So there they are. With the information and examples in this lesson, there’s a lot you can work on, for quite some time, especially if you are new to the fingerpicking technique.