In the last few lessons, we’ve learnt about scales – what they are, why they’re important and how to practise them. In the previous lesson, we looked at the all important minor pentatonic scale.
In this lesson, we are going to use the minor pentatonic scale to jump into the world of lead guitar, through learning licks, solos and improvising.
What Are Licks?
A ‘Lick’ is a short phrase or melody usually based around a scale. It usually only goes for a few seconds/bars and just sounds cool. You can think of a lick as a bite-sized chunk of musical goodness.
Why Do We Learn Licks?
We use licks to develop an arsenal of musical phrases that we can use, adapt and embellish when soloing. They are also a great way of getting to know a scale. A scale played by itself doesn’t really say anything musically. A scale is really a series of notes that convey a sound, but we need to know how to use the notes in the scale musically. Licks help us do this.
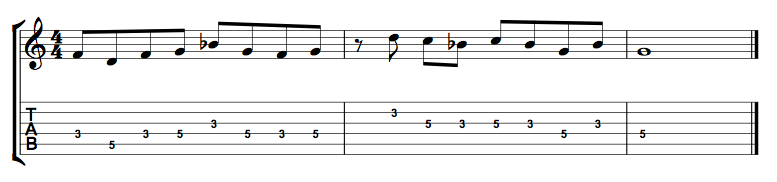
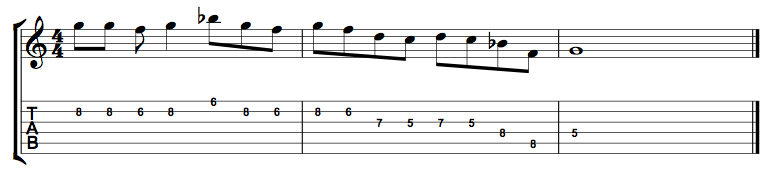
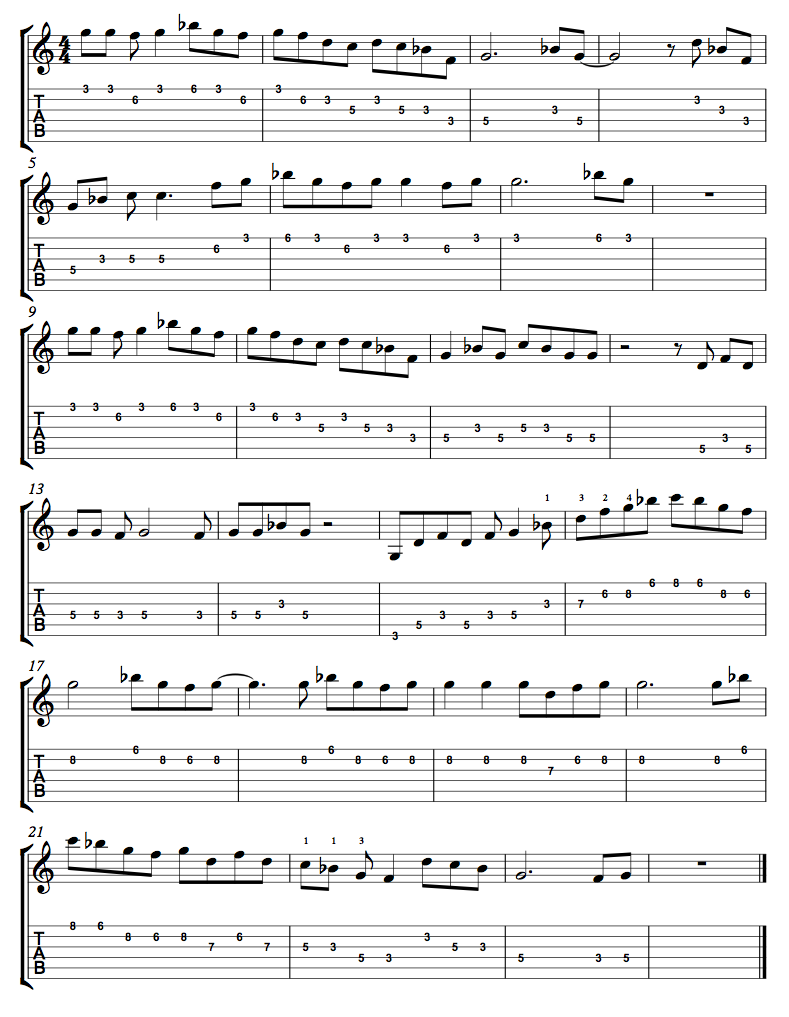
5 Minor Pentatonic Licks
The best way to demonstrate what licks are, is to use examples and learn some yourself. We’re going to look at the first minor pentatonic shape that we did in the lesson on minor pentatonics. We’re going to be playing these licks using the G minor pentatonic scale. Just to refresh, here is the G minor pentatonic shape that we will be using:
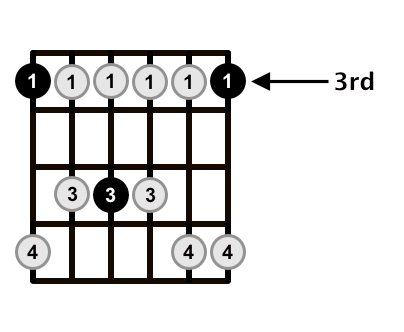
Play the G minor pentatonic scale as written above, to re-familiarise yourself with the scale. Then have a go at playing the following five licks:
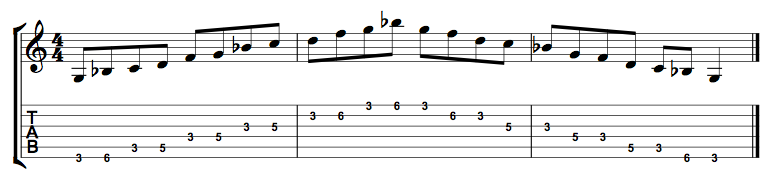
G Minor Pentatonic Lick 1
G Minor Pentatonic Lick 2

G Minor Pentatonic Lick 3
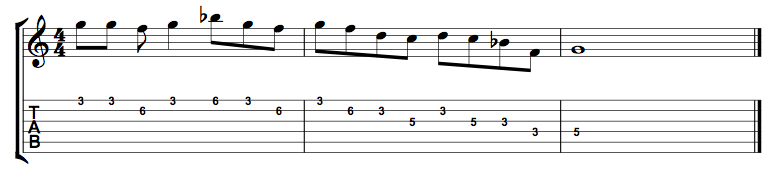
G Minor Pentatonic Lick 4

G Minor Pentatonic Lick 5
As you can hear (and possibly see), each lick is simple, catchy and uses notes from the scale that we have chosen to use. You should learn these licks and compose your own. Here are a few guidelines when composing your own:
- To start with, pick one shape and use only notes within that shape.
- Keep the rhythms simple. Think of a simple rhythm in your head and then try to use that rhythm for the lick.
- Favor the root note – the root note is like your home note that always sounds safe.
- Don’t be afraid to experiment and adjust until you find something that sounds good to you.
- Use other licks as a starting point (such as the ones above).
By composing your own licks, you take ownership of the scale/shape that you are using and start knowing it intimately.
Improvising
Improvising is the ultimate display of lead-guitar skill. There is definitely a time and place for playing pre-written solos note for note (and we will get to that), but being able to improvise guitar solos demonstrates a true mastery of lead guitar. Being able to improvise means to be able to come up with a new solo, that you’ve never played before, on the spot. It is true expression.

Think of any of your guitar heroes of any style of music. Steve Vai, B.B King, Pat Metheny, John Frusciante, Kurt Cobain, Eric Clapton. Improvising is a big part of their experience as musicians.
While being able to improvise well is really the end goal for lead guitar, we can and should use improvising right from the beginning as a way of learning material. Learning scales is no exception.
But how do you get started? For some reason, improvising is one of the most daunting things for guitarists (not just beginners) to do. It can seem like you are putting your soul on the line, for all to judge. I have taught many students who freeze when I ask them to improvise. They may be quite experienced guitar students, happily playing anything given to them, mistakes and all. But when I ask them to improvise using a certain scale, they freak-out. It’s like I’ve asked them to get in front of a crowd and do an interpretive dance.
The good news is, it gets easier the more you do it. You just have to start. If you start in the comfort of your own room, without anyone listening, it will be easier to do it when you are with other people. Getting started is easy, all you need is a nice little one-chord vamp.
One-Chord Vamps
Vamps are really just backing tracks that are looped over and over again. Usually there are only a few chords involved. A two-chord vamp would consist of two chords, cycling from one to the other every few bars. There are no hard and fast rules as to what makes up a vamp. It could be played by just one guitar, going from G to A. There could be a whole band providing the backing, including drums.
Vamps are generally pretty simple, contain not many chords and loop continuously.
As you may have guessed, they provide a great canvas for improvising over.
Here is an example of a one-chord vamp, using G minor. This goes for a few minutes, so you can stop it when you get the gist.
What you should do now is practise improvising over the vamp, using the minor pentatonic shape that we have been using in this lesson so far. There is no ‘right and wrong’ here. Of course, I can’t give you feedback, because I am not there with you. But here are some more guidlines:
- Start by using a few of the licks that you have already learnt or composed.
- Get comfortable playing these licks with the vamp.
- Embellish them slightly – change one note. Add one note. Vary the rhythm slightly.
- Slowly get more and more adventurous until you are improvising completely new phrases (they should still be simple).
- Remember that there are no mistakes – if you play something that you think doesn’t work, adjust it until you like it, then play it 100 times until it becomes part of your bag of tricks.
Here is an example of me improvising over the same vamp, using the first two licks that we did as my starting point.
Learning To Improvise By Not Improvising
A kind of irony with learning to improvise is that learning set material is a great way to develop your improvising skills. By learning set material, you expand our musical vocabulary and develop a greater knowledge of the scale(s) that you are working with. This allows you to improvise more freely and expressively. This is why learning licks is so important. We don’t necessarily want to just spit out a series of licks when we are improvising, but by learning them, we are giving ourselves the tools to be able to improvise.
Moving On To Other Positions
The process of learning licks as a way of getting to know a scale can be applied to any scale that you learn, but we are sticking with the minor pentatonic scale for today.
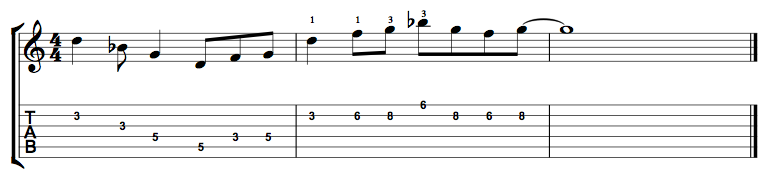
So far however, we have only used one position. As you have probably figured, the same process can easily be applied to all five positions of the minor pentatonic. Let’s look at the next shape along the fretboard for G minor pentatonic.

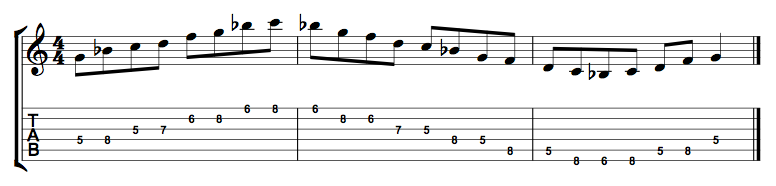
Here are 3 more licks for this shape:
G Minor Pentatonic Lick 6
G Minor Pentatonic Lick 7

G Minor Pentatonic Lick 8
Of course, you should use the vamp and practise improvising in this position.
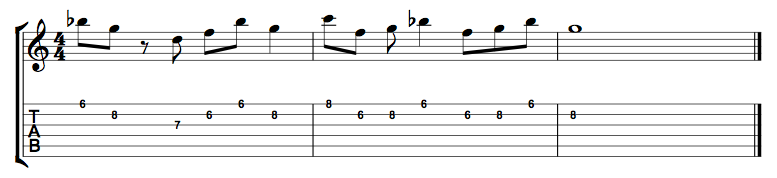
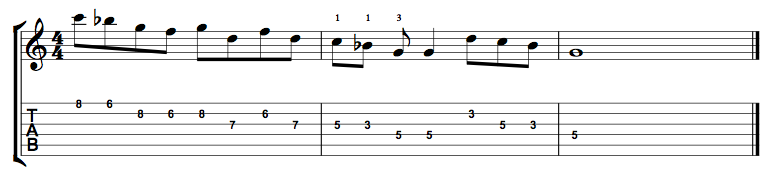
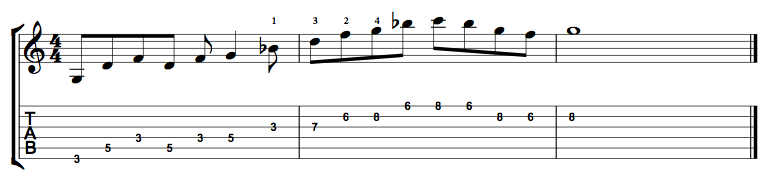
The world of improvisation is so expansive that there are more ideas and practice techniques than there is time. So far, we’ve learnt five licks in one position, using the minor pentatonic scale, and three different licks in another position, using the same scale. But of course, we could relearn any of the licks, in a different position. For example, we could use the first lick that we did and play it in the position that starts on the 5th fret:
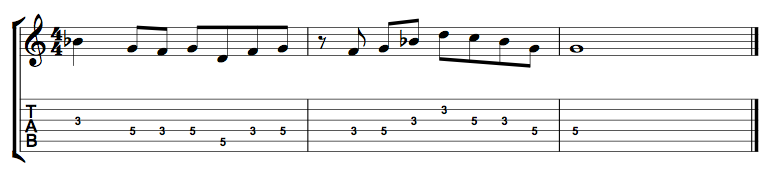
Lick 1 In The 3rd Position (original)
Lick 1 In The 5th Position
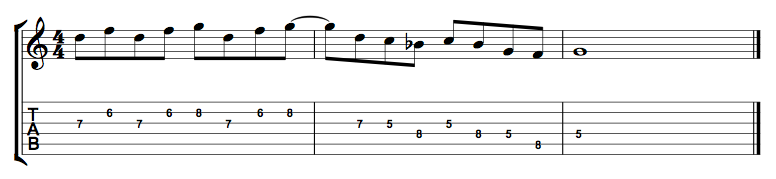
Of course, we could take a lick that we learnt in the 5th position and relearn it in the 3rd position:
Lick 7 In The 5th Position (original)

Lick 1 In The 3rd Position
Connecting Shapes Together
Now that you’ve improvised using two different positions, you pretty much know the process that can be used for the remaining positions. But even when you’ve learnt licks and improvised in five different positions, there is still a lot more to do. What about going from one position to another? When we solo, we rarely stick to one position. Playing exclusively in one position for a while then simply moving to another position and doing the same thing can sound a bit robotic. Being able to transition seamlessly from one shape to another is what you need to be able to do. How can we practise doing that? You guessed it – learning more licks!
The aim with these connecting licks, is to play phrases (just like before) but start in one position and end in another. The same guidelines apply, but things get a little trickier because we are essentially dealing with two positions in the one lick. The tabs are very useful here, as they tell us where to play each note. I’ve included fingering for the notes that are involved with transitioning from one position to another. Here they are:
Connecting Lick 1
Connecting Lick 2
Connecting Lick 3
Too Much To Learn?
You might be thinking, how on earth can I learn all this? We’ve only looked at one scale, in one key! How am I supposed to learn licks in five positions, then learn more to connect them together, then change keys and start again, then learn a new scale etc.
There is a lot to do. I’ll admit that. It can be daunting. But the good news (apart from it being fun – after all, who needs a social life when you can spend your friday nights improvising over two-chord vamps) is that by learning one thing, you’re actually learning skills that will carry over to the next thing you learn.
When you learn licks in one position of the the minor pentatonic scale for example, you develop skills that will help you when you move to the next position. If you practise one key thoroughly, moving to another key is not at all like starting again. The licks that you learnt in the previous key will still be usable, you just have to transpose them so that they can be played in the new key. When you learn a new scale, the sense of melody that you learnt practicing the first scale will help you develop melodies more easily with the new scale. And so on it goes.
Whenever you focus on one thing, you develop skills and technique that can be used for other things.
I’m not saying that it’s not hard, or that it doesn’t require a lot of work. But you should view improvising as a fun, never ending journey that you just need to start!
Learning Solos
If learning to improvise is one half of lead guitar, the other half is learning pre-written solos. There are many benefits to doing this. It is in a way, an extension of learning licks – by learning solos, you develop ideas, techniques and phrases that make you a better player. As well as those things, learning solos note for note can be one of the most fun things to do. If you’re into Joe Satriani, there’s nothing more satisfying than playing one of his solos note for note, just like the recording. We could spend a whole lesson discussing the benefits of learning solos note for note, but I think you get the idea. Dave Liebman, a saxophonist who has worked with Miles Davis, has written a great article on the subject.
To finish off, we’re going to look at a solo that I have written for this lesson. It is played over a G minor blues, which means the G minor pentatonic scale works over the whole thing. The solo is based on the licks that we have done in this lesson. It doesn’t move outside of the two positions that we have done.
Have a listen and try to learn it yourself.
I have also included the backing track without the guitar part, so that you can practise playing along with it and use it as another backing track to practise improvising over.
Summary
We’ve covered a lot in this lesson. While it hasn’t neccesarily been a longer lesson than previous ones, I feel like this one really opens up pandora’s box. With the principles learnt in this lesson, you really do have something to practise for the next 100 years. But keep in mind that the principles that we’ve discussed are more important than the material itself. Learning scales, composing licks, improvising, soloing – these are things that you can practise for the rest of your life. You might as well start now! Just to summarize, here are some dot points that you can use when approaching improvisation using scales:
- Learn the scale in five positions.
- Pick a position and learn/compose short licks.
- Improvise in that position using a vamp.
- Repeat the process using the other four positions.
- Practise connecting between the different positions. Learn/Compose new licks to help with this.
- Learn/Compose solos.
- Experiment and keep learning!
Simple right? Congratulations. If you’ve kept up in this lesson then you’re well on your way to becoming a lead guitar wiz!
Next lesson we’re going back to the gym to learn some new techniques and technical exercises.
Stay tuned!
Further Reading:
- Using Patterns To Master Scales – A great way to master scales and come up with ideas for soloing is to use patterns. This lesson explains how.
- Guitar Modes Explained – Not for the faint hearted. There’s a lot of theory in this lesson. If you want to know about guitar modes, have a read.
- Scales Page – A link to the scales page of this site. More scales than you can poke a stick at.
- Creating licks with the Dorian Mode – In this lesson we look at using the dorian mode to improvise with. It’s a pretty advanced lesson, but you may find it interesting.