
This is the final lesson in a brief series of lessons. So far we have looked at the following:
- Basic Intervals (tones and semitones).
- The music alphabet and unlocking the fretboard.
- Using intervals to build scales.
- Using the major scale to build scales.
In this lesson, we are going to look at a range of other intervals, as well as using a few geometric tricks on the guitar, to help you navigate the guitar fretboard.
Intervals
In the lesson on basic intervals, we learnt about tones and semitones. In short, a semitone is a distance of 1 fret from one note to another, and an interval of a tone is a distance of 2 frets (2 semitones). As you have probably already figured, there are intervals that are larger than 2 frets, and they all have names.
The key to understanding other intervals is to understand the major scale. If you’re unfamiliar with major scales and using intervals to build scales, I recommend reading the lesson on scales. In summary, the major scale is made up from the following sequence of intervals:
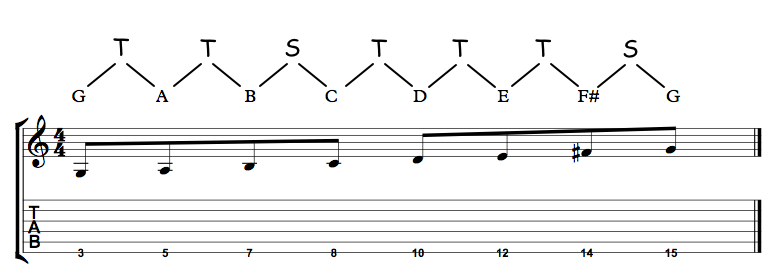
Tone – Tone – Semitone – Tone – Tone – Tone – Semitone
By playing the scale on one string, we can really visualise the intervals as we play the scale. Let’s play the scale starting on the 3rd fret of the 6th string. Since that note is ‘G’, we will be playing a G major scale.
The reason why plotting out the major scale in this way is important, is that we effectively use degrees of the scale to determine the names of intervals. Going from the first note of the scale to the second note of the scale is a certain interval. Going from the first note of the scale to the third note of the scale is another interval, and so on. To demonstrate, let’s look at each of the intervals in greater detail.
Major 2nd Interval
The interval of a ‘Major 2nd’, is the interval that is achieved by going from the first note of the major scale to the second note of the scale. It is a distance (interval) of 2 semitones. As you should already know, an interval of two frets is also called a ‘tone’. So now you have two ways of referring to an interval of 2 frets – ‘tone’ and ‘major 2nd’. Let’s look at the G major scale that we just played, with the interval in question highlighted.

Major 3rd Interval
The interval of a ‘Major 3rd’ is an interval that is achieved by going from the first note of the major scale to the 3rd note of the scale. It is technically a distance of 4 semitones (or 2 tones), but it is more important at this stage to understand that it is the interval that is achieved when we move from the first note to the third note of the major scale. Let’s look at the original G major scale on the 6th string, with the new interval highlighted.

As you can see, we have moved from the 3rd fret (1st note of the G major scale) to the 7th fret (3rd note of the G major scale). Because we have effectively moved up 3 scale tones (including the first note), it is called a major 3rd.
Perfect 4th Interval
The interval of a ‘Perfect 4th’ is achieved by moving from the first note of the major scale to the fourth note of the major scale. It is a distance of 5 semitones.

Perfect 5th Interval
The interval of a ‘Perfect 5th’ is achieved by moving from the first note of the major scale to the fifth note of the major scale. It is a distance of 7 semitones.


Major 6th Interval
The interval of a ‘Major 6th’ is achieved by moving from the first note of the major scale to the sixth note of the major scale. It is a distance of 9 semitones.

Major 7th Interval
The interval of a ‘Major 7th’ is achieved by moving from the first note of the major scale to the seventh note of the major scale. It is a distance of 11 semitones.

Octave Interval
An interval of an octave (also known as a ‘perfect octave’) is the distance of 12 semitones. When we play through the major scale until we get to the root note again, we have reached an octave. Two notes that are an octave apart are the same note but in a different register. The easiest way to understand octaves (apart from playing them yourself on the guitar, which you should do) is to imagine a male and a female singing a song together. Because of the different ranges of male and female voices, they would most likely be singing the exact same notes, but one octave (or maybe two) apart.

So now you know the names of seven different intervals. You don’t need to know why some are called ‘major’ and others ‘perfect’. That doesn’t matter for now. You just need to know what each interval is and what it’s called.
Look at the table below that provides a summery of the intervals that we have looked at.

The In-Between Intervals
We have looked at seven intervals based on the major scale, but as you may have figured out, there are other intervals that we have missed. Let’s go through them now.
Minor 2nd
The interval of a minor 2nd is a distance of 1 semitone.
Minor 3rd
The interval of a minor 3rd is a distance of 3 semitones.
Tritone
The interval of a tritone is a distance of 6 semitones. It is called a tritone because it is an interval of 3 tones.
Minor 6th
The interval of a minor 6th is a distance of 8 semitones.
Minor 7th
The interval of a minor 7th is a distance of 10 semitones.
Here is a table that lists all the intervals that we have covered in order of size:

So now we have covered all of the intervals within one octave. Although we used the G major scale as an example, it’s important to remember that these intervals are movable. If you play any note and then play another note six semitones higher, you have just played the interval of a tritone. If you play any note and then play another note 11 semitones higher, you have just played the interval of a major 7th. You get the idea.
Geometric Hacks
So far, we have looked at intervals by sticking to one string. This is a great way to visualise the intervals and demonstrate the concept of distance as you play the intervals. However, in much the same way that we can play the one scale in different positions, we can also play one interval in a variety of ways.
This brings us to a unique advantage that the guitar gives us over other instruments. The guitar is set out in a very geometric way. Guitarists have the ability to visualise things such as scales and intervals. Although this does present some challenges (learning all the notes on the fretboard is perhaps harder than on a piano for example), the ‘geometry’ of the fretboard makes it easy to play intervals based on shapes.
Let’s do an example.
The interval of a perfect 5th can easily be played by playing the first note on one string, then playing the next note down one string and up two frets. What we are effectively doing is reducing the interval to a movable shape. The shape that I just described looks like this, with the first note being the darker note.

We can memorise this shape and play perfect 5ths up and down the fretboard. Here are a few examples.


As you can see, we have produced an interval of a perfect 5th, three times in different positions, using the one shape. The advantage of using shapes to produce intervals can best be expressed by the fact that it allows us to play intervals without even knowing the names of the notes that we are playing! This is impossible on most other instruments, yet on the guitar, it is very easy. Not that it is necessarily a good habit to ignore the actual notes that you are playing, but it is worth observing that with interval shapes, we can play intervals based purely on geometry. That’s why I have called them ‘geometric hacks’.
By the way, if you compare the new shape that we have just looked at to the original perfect 5th interval that we produced on one string, you will hear that they are the same. Simply use the same starting note when comparing and you will hear that they are the same.
Moving Interval Shapes Up And Down Strings
In the movable examples that we just looked at for the perfect 5th, we kept the starting note on the 6th string each time. We can of course move the shape up and down strings. Here is how the shape looks when starting on different strings.


With the above five images, you can see how the original shape can be moved up and down strings. But wait… the shape changes when we get to the forth image. There is an extra fret separating the two notes. Why is this?
This happens because of the way that we tune the guitar. The intervals (you know what they are now, right?) between each string are not consistent. Have a look at the following image:

As you can see, the interval between adjacent strings is always a perfect 4th (the interval between the 6th and 5th strings, the interval between the 5th and 4th strings etc.), except for the interval between the 3rd and 2nd strings, which is a major 3rd.
All that this means is that our shapes change when we get to the 2nd string.
Geometric Shapes For Every Interval
What we’re going to do now is look at interval shapes for every interval that we have covered. For most intervals, there are a few shapes that we can use, so I’m going to limit the shapes to those that fit within five frets. Just like the ones before, play the darker not first, followed by the lighter note. Each shape includes suggested fingering for each note, but that’s not important. An interval is an interval regardless of which finger you use. Here they are:
Minor 2nd Interval (1 Semitone)


Major 2nd (2 Semitones)


Minor 3rd Interval (3 Semitones)


Major 3rd (4 Semitones)


Perfect 4th (5 Semitone)


Tritone (6 Semitones)


Perfect 5th (7 Semitones)


Minor 6th (8 Semitones)


Major 6th (9 Semitones)


Minor 7th (10 Semitones)


Major 7th (11 Semitones)


Perfect Octave (12 Semitones)


Ascending, Descending And Unison
In the examples that we have done, we have played the lowest note (pitch-wise) first and then played the higher note next. The thing to keep in mind is that intervals can be played ascending, descending and in unison. The lowest note in each case is always a kind-of anchor. What that means is that from a labelling perspective, there is no difference between this (major 3rd ascending)

this (major 3rd descending)

and this (major 3rd unison)

This is actually a good thing. It makes our shapes even more useful, because if we want to play an interval descending, we use the exact same shape that we use for the ascending version. We simply play the lighter note first and then play the darker note.
Summary
Being familiar with intervals is very beneficial, as it has many uses relating to scales, melodies, chords and a whole range of other things. I will most likely post more lessons relating to intervals in the future, but hopefully this lesson has been a comprehensive guide to playing and understanding them.