How do you tune a guitar? If you’ve just started playing guitar, this is one of the first and most pressing questions that you will have. No matter what you are planning to play or learn on the guitar, you need your guitar to be in tune. This means that you will need to know how to tune your guitar – regularly and accurately.
How Often Should You Tune?
Beginners often think that once their guitar is in tune, they are all set for a while. This is not the case. You should get into the habit of tuning your guitar once a day, or even more. Guitar is not like a piano, where you generally only need to get it tuned once every few months. The intonation on the guitar is temperamental and is easily affected by many things – the weather, how often it’s played, the room it’s in, being transported around. It’s very easy for a guitar to go out of tune.
You need to know how to tune a guitar if you want to be a guitarist.
Using A Tuner
The good news is that these days, it’s very easy to acquire the tools you need to get in tune. All you really need is a tuner – most likely in the form of an App on your phone.
Only a few years ago, having a tuner meant that you had to purchase a standalone device. These devices were usually quite expensive, were of varying qualities and needed batteries to operate. Since the advance of the smart phone however, it’s very easy to obtain an app that is equal to, or superior than the standalone tuners that were once a necessity. Many of these apps are free. These days, if you have a smart phone, acquiring a tuner is simply a matter of downloading an appropriate app, in a matter of minutes.
We are going to start off by exploring how to tune a guitar using a tuner. For the sake of this lesson, a tuner could be an app on your phone, or a standalone device.
Know Your Strings
The main requirement when tuning your guitar (apart from knowing how to twist the machine heads), is knowing the names and numbers of the strings on the guitar. We’ll explore the reasons why shortly, but basically, you and your tuner both need to know which string you are trying to tune at any given time.
Here are the names and numbers of the strings:

as you can see, the string names, from 1 to 6 are as follows
- E (1)
- B (2)
- G (3)
- D (4)
- A (5)
- E (6)
In the image above, the ‘thick’ and ‘thin’ strings are labeled, so that you don’t get the 1st and 6th strings around the wrong way.
When you’re holding the guitar as you would when playing, the 6th string is at the top (closest to the ceiling) and the 1st string is at the bottom (closest to the ground). Saying things like ‘top’, ‘bottom’, ‘high’ and ‘low’ can be risky because it can be confusing as to whether it is a reference to pitch or actual height. That’s why I’ve used the ‘thick’ and ‘thin’ references (and also ‘ceiling’ and ‘floor’).
Once you are familiar with the strings on the guitar, it’s time to start using your tuner.
Using Your Tuner
As I mentioned, acquiring a tuner is really just a matter of downloading an app. I use an app called Cleartune. It’s a great tuner. It costs a few dollars but is worth it. There are many others and many of them are free.
Most tuners will differ in how they look and a lot of them have their own little quirks and unique functions – some small and some quite noticeable. It’s hard to give a fool-proof guide to using tuners that covers every app/make/model and variation, so I am going to focus on the general functionality that all tuners should have.
In a nutshell, using a tuner is a matter of playing a note and then reading the gauges so that you know how much and which way to adjust the tuning of a particular string. You play a note, the tuner detects the pitch of the note and then tells you how much to adjust. Generally speaking, guitar tuners come in two categories – ones that automatically try to detect the string that you are playing and ones where you tell it which string you are playing each time that you tune a string.
Let’s assume that you’re using a tuner that detects which string you are playing. With these types of tuners, you play an open string, the tuner detects which string you are playing and then tells you how far off in pitch you are.
Let’s say you play the A string (5th fret), open.
A common design is to use a needle, that moves from left to right, depending on how in tune the string is. The aim is to get the needle in the center, which means that it is in tune. If the needle is to the left of center, it means that the string is flat. If it is to the right, it means the string is sharp.
Observe the three images below, of a note that is flat, a note that is in tune, and a note that is sharp.
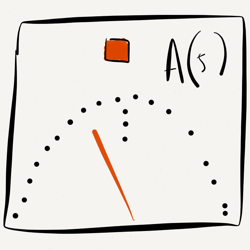
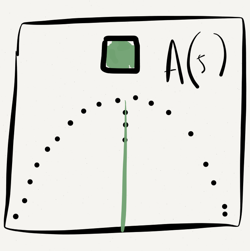

These images are typical of how tuners work, both in design and in function, although, as I mentioned, tuners do vary. Some don’t use needles, but use lights, or buttons instead. I have seen tuners that get very fancy with the display. Still, most tuners have a gauge that tells you whether you are sharp, flat or in tune and once you have played around with the tuner for a few minutes, you will know how it displays the information.
Sharp, Flat, In Tune – How To Adjust
If your string is sharp, you need to lower the pitch of the string (using the machine heads) until the tuner tells you that the string is in tune. If your string is flat, you need to raise the pitch of the string, until the string is in tune.
This seems like a pretty obvious point, but people often struggle to adjust the tuning of a string. The best approach is to play the note and observe the reading on the tuner. This should let you know which way to adjust and by roughly how much. What you should then do is play the string again and adjust the tuning (using the machine head that corresponds to that string), while listening to the pitch move. This is an important point. Often, beginners will stop the string from ringing and then rotate the machine head, approximating how much they should rotate it.
The problem with doing this is that you are really just guessing. Also, you are not developing an aural sense of what is happening. When you listen to how much the pitch of the string is changing, you develop a sense of distance (in pitch) with your ears and become much more aware of the nuances of pitch. At the beginning, you might find that you are constantly adjusting too much or too little, but with a little bit of practice, you develop a strong intuition with tuning your guitar.
By the way, if you’re not sure which way to rotate the machine head, again, you just need to use your ears. If the pitch goes up, you are sharpening the string. If it goes down, you are flattening the string.
The Importance Of Knowing Strings
A common mistake that beginners make is this – they play a string (such as the A string) and the tuner tells them that they are flat (or sharp, but let’s go with flat). They keep raising the pitch of the string until the point where the tuner tells them they are in tune. But they’re not in tune. In fact, they’re lucky that they haven’t snapped a string. Why? Because the string was so far out of tune that the tuner thought the string being played was the D string. Tuners are smart, but they’re not that smart. If the string that you are trying to tune is so far out of tune, it will think it is a different string.
This really only happens with tuners that detect the note that you are playing. If you have manually selected the string that you are tuning, then this probably won’t happen. Either way though, you need to know the name of the strings, so that you can tell the tuner which string you are tuning (if it has that option), or make sure that the tuner is displaying the correct note on the display (if it is detecting which string you are playing). If the display says ‘D’, when you are tuning the A string, your probably way out of tune!
Keep in mind also that a lot of tuners these days are ‘chromatic’. This means that you can tune to any note, such as ‘F#’. Cleartune is an example of a chromatic tuner. Still, knowing the names of strings is just as important, because tuning a string using a chromatic tuner is simply a matter of tuning it to the note that it should be.
What If Your Guitar Is Way Out Of Tune?
If your guitar is way out of tune, your tuner will either think it is a different note, or it might even fail to register a reading.
A good practice is to make sure your strings are approximately in tune to begin with by using reference pitches. A reference pitch is literally a tone that sounds, so that you can hear it, compare it to the sound of the string that you want to tune, and then adjust using the string.
Obviously, this requires a bit of aural skill. The idea is that if your string is extremely out of tune, you hear the reference pitch and know which way the string needs to be adjusted. You might not be able to get it perfectly in tune, but you know which way it needs to go. You can therefor get it roughly in tune, then use the tuner to finish it off. The challenge with doing this is that beginners often struggle to determine if a note is sharp or flat, relative to a reference point. They might know that the note is out of tune, but not know which way to adjust.
All I can say is that with practice, it is a skill that can be developed pretty easily, so just give it a go. This is another reason why adjusting the tuning while listening to the string is important, you need to develop a relationship between what you are hearing, and what you are physically doing with the machine heads.
Reference Pitches
Here is a reference pitch for each string. Feel free to actually use these when tuning:
E
A
D
G
B
E
Summary
This has been a pretty long winded explanation for something that you might be able to do intuitively. Tuning with a tuner should be pretty easy, but like anything, it can be confusing if you have never done it before. Once you have done it a few times, it will become very easy, to the point where it takes you a few seconds. So get started!