Do you need to be able to read music in order to be an accomplished guitarist? Technically speaking, no you don’t. In this lesson series so far, we have already learnt to play riffs, chords and melodies without using standard music notation. You can master a lot of things with tablature, videos, experimentation, jamming and more. So the question should be asked…
Why Learn To Read?
The answer is that reading is easy, enjoyable, and it opens up a range of new possibilities. I like to think of it as learning to read a language. You do not need to be able to read and write to speak a language, yet it is widely understood that learning to read and write is a fundamental skill in becoming educated.
With music it is no different. When you learn to read, you develop the ability to more effectively analyse and comprehend concepts relating to theory, pitch, rhythm and much more. Think of learning to read as developing your music IQ. Some students resist the need to read. They view playing guitar as fun and reading as boring and unnecessary. To them, I usually point out that learning to read is easy and it shouldn’t replace anything else that you are learning. If you have your mind set on learning a Steve Vai solo using tabs and videos, by all means, keep doing it. But why not have the best of both worlds and learn to read on the side too?
Things To Keep In Mind When Learning To Read.
- It’s Easy – Learning to read isn’t hard. The concepts are quite simple. It just takes time.
- Be Patient – The goal of learning to read isn’t just to understand the concepts involved. It’s important to learn a few notes at a time and then use repetition to become familiar with the notes. This is easy, but takes time.
- You’re Learning A Global Language – One of the reasons why learning to read is so beneficial, is that you aren’t just learning how to read music for the purpose of playing guitar, you are learning to read music in general. Guitar tablature is really a set of instructions designed to enable you to play specific things on the guitar. Guitar tablature however, is useless to a piano player or a singer. Music notation however, is not specific to the guitar. While specific guitar related symbols do exist, you are more or less reading the same system that is used for all instruments.
- You Are Learning The Fundamentals Of Music – When you learn to read music, you learn about fundamentals, such as pitch and rhythm.
- Technical Benefits – When you learn to read, using a method book (which is the best way to learn to read), you get the added technical benefits of playing through all the exercises in the book. While it can seem enticing to try to learn all your favorite songs as soon as you pick up the guitar, one of the best ways to develop technique is to play through the exercises in a book, organized in a systematic way.
- You Don’t Need To Be An Expert – Remember, the goal of learning to read isn’t to be able to instantly sight-read complicated pieces of music (although, there’s no reason why you can’t develop your reading skills to that level). Your initial goals should be to be able play a piece of music using notation, transcribe music (such as music you have written) and be able to explore musical concepts (for example, figuring out the notes in a ‘Db minor 11’ chord).
Let’s Get To It.
The purpose of this lesson is to begin learning to read, so let’s get to it. Before we start exploring notes and rhythms, we need to familiarize ourselves with a few important things that go hand in hand with music notation.
The Staff
The ‘staff’ is effectively the blank canvas on which music is written. It contains five lines and looks like this:

It’s important to remember – This blank staff is not guitar tablature. There are horizontal lines that make up the music staff. With guitar tablature there are six lines (one for each string).
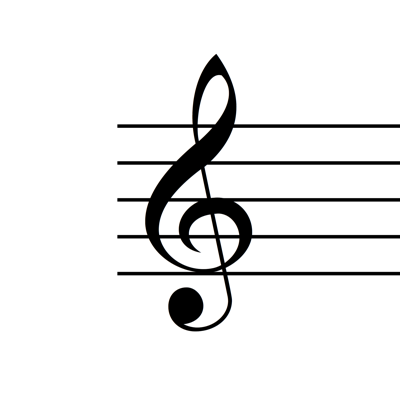
Treble Clef
The ‘Treble Clef’ is an interesting looking graphic which basically tells us about the range of notes that we will be using. Certain instruments use different clefs, which change the rules relating to pitch. The good news – you don’t have to worry about what the clef actually does. For now, just know that it is called the ‘Treble Clef’, and as guitarists, it is the one we use when reading. It looks like this:

The clef usually appears at the start of each line of music:
Time Signature
The ‘Time Signature’ tells us how many beats are in every bar. We’ll explore the concepts of beats and bars shortly. For now, let’s just look at a few examples of time signatures:


Notes
If the staff is the canvas, the paint is the ‘notes’. Notes effectively tell us what to play. Here are a few examples of what notes look like, when placed on the staff.


Rhythm
We looked at rhythm when we explored chords and strumming in a previous lesson. We’re going to revisit the concept here, as it is vitally important to music and reading.
The Pulse/Beat
As we explored in an earlier lesson, the pulse of a song is exactly what it implies. It’s like a never ending beat that keeps going from start to finish. Regardless of what we play over the top of this pulse, it keeps going. The most important thing about the pulse is that it doesn’t slow down or get faster, thus creating an almost hypnotic trance which forms the perfect platform to build music on.
Tempo
The tempo is the speed of the pulse, messured in ‘Beats Per Minute’ (‘BPM’). This is literally a measurement of how many ‘beats’ fit into a minute. Therefor, the higher the BPM, the faster the pulse. The lower the BPM, the slower the pulse.
Here is a sample of a continuous pulse at 75 BPM.
Here is a sample of a continuous pulse at 120 BPM.
The Meter
In music, we organize the beat (pulse) into continuous groups. These groups create a sense of momentum and repetition and provide a way to organsize the music that we are reading and playing. This is also known as the ‘Time Signature’. The most common way to group these beats is ‘4/4’ (said like ‘Four Four’). This simply means that we are grouping beats in four. This will become more clear when we do some exercises. As an exercise, count out loud the following, making sure that you keep a consistent and steady beat (don’t slow down or speed up):
“1, 2, 3, 4, 1, 2, 3, 4, 1, 2” etc.
It should sound like this:
By doing this, we are expressing the time signature of 4/4. This is also known as ‘Common Time’.
For some songs, the time signature consists of cycles of three, known as 3/4. The reason for organizing a song into groups of three is that it gives the song a different feel. 3/4 just feels different to 4/4. Let’s do another exercise. Count out loud the following:
“1, 2, 3, 1, 2, 3, 1, 2, 3” etc.
It should sound like this:
Now that we know what 4/4 (common time) is, we need to know what it looks like on the stave. It can be written in two ways. Simply as 4/4:
Or with the following ‘C’ symbol, which stands for common time (4/4):
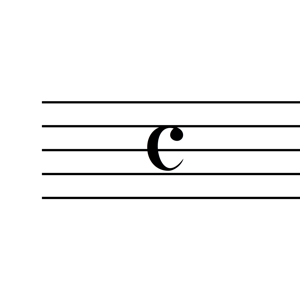
When we are reading music, we see the time signature at the start of the music and then we usually don’t see it again. In this lesson, we will only be dealing with 4/4. Most music that we play is in 4/4 and once you have mastered the principles of reading, moving to another time signature is relatively easy.
Bars And Bar Lines
When playing in 4/4, every group of four beats is known as a ‘Bar’ of music. When reading music, we use ‘Bar Lines’ to start and finish a bar of music. Look at the image below. Observe the vertical lines, used to indicate the start and end of bars:

Let’s Make Music:
So far, we have explored the macro elements of a music score. The kind of ‘global properties’ that create the backdrop for playing notes of music. Now we’re going explore what we came here for – reading and playing music.
As I mentioned earlier, reading music is really about two things – pitch and rhythm. If we could boil it down to two questions, it would be this:
- Which note do we play (pitch)?
- How long do we play it for (rhythm)?
We’re going to start by exploring rhythm. Remember, rhythm is all about how long we hold notes for. Earlier in this lesson, we explored the concept of the ‘pulse’, ‘beats’ and the ‘meter’. We use beats as a measurement of how long to hold notes for.
Quarter Notes/Crotchets.
A ‘Quarter Note’ or ‘Crotchet’, is a note of music that goes for a duration of 1 beat. It looks like this:
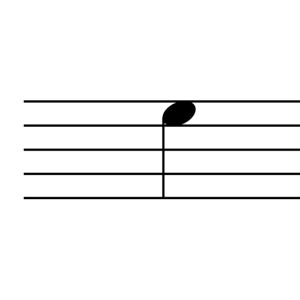
It consists of a note head, with a stem. The stem can be facing up or down. That doesn’t change anything.
The name ‘Quarter Note’ is an American term, whereas the name ‘Crotchet’ is an English term. They both refer to the same thing.
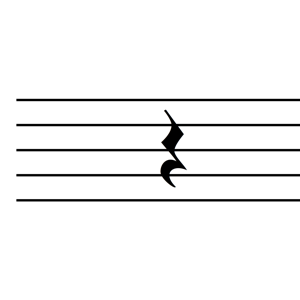
Rests
The other thing we are going to learn before we start playing some exercises is a ‘Quarter Note Rest’ or a ‘Crotchet Rest’. A ‘Rest’ is effectively a note of silence. When we see a rest, we play nothing for however long the rest goes for. A rest that goes for one beat looks like this:
So we know that a quarter note is a note that goes for a beat. The best way to really understand this concept is to play some exercises using quarter notes. The following exercises involve clapping only. We will transfer what we’re doing to the guitar soon enough, but using clapping allows us to really understand rhythm in its most basic format before introducing other things.
We’re going to play ten exercises which go for four bars each, with audio examples. In each audio example, you will hear counting underneath.
You should practise clapping along with the audio and counting out loud. You should also practise playing and clapping the exercises without the audio.
10 Clapping Exercises
The first exercise consists of continuous quarter notes. Therefor we clap on each beat of every bar. It looks like this:
Clapping Exercise 1

It sounds like this:
As you can hear, there is a clap on each beat. The first note (well… clap) is played on the first beat of the first bar. Because it goes for one beat, it means that the next note (clap) will be played on the 2nd beat. This note also goes for one beat, so the next note will be played on the 3rd beat, and so on.
Notice that there are numbers at the bottom to show notes aligning to beats of the bar. These numbers are almost never displayed in regular sheet music. They have been included here to make things more obvious.
Clapping Exercise 2
In the second exercise, we are going to introduce a rest. Remember, a quarter note rest is a note of silence, which means that in this case, there will be no clapping on the beats where a rest lies:

There is a rest on the 4th beat of every bar. This means that on the 4th beat of each bar, we don’t play anything. It’s very important to observe that even though we don’t play anything when there is a rest, the beat still occurs (in this case, the 4th beat). This is a super important concept to understand as it underpins the greater concept of rhythm in general. The beat and meter are constant! What changes are the things that we play over the top. Again, listen to the audio and try it by yourself.
At this stage, you should always count out loud. Counting out loud is very important, especially when learning about rhythm. With experience, you will be able to ‘feel’ the beat and meter even when you are not verbalizing them. It becomes like an internal clock that automatically kicks into gear whenever you play a song. To begin with however, you need to do many exercises that involve counting out lout, so that it becomes part of your subconscious.
Let’s do the remaining exercises. Observe, play along with the recordings and then try them by yourself!
Clapping Exercise 3

Clapping Exercise 4

Clapping Exercise 5

Clapping Exercise 6
For the next five exercises, we are doing away with the beat numbers written underneath the staff.

Clapping Exercise 7

Clapping Exercise 8

Clapping Exercise 9

Clapping Exercise 10

Now For The Guitar
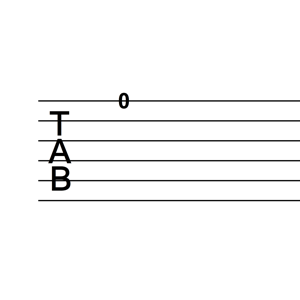
The purpose of clapping is to reduce an exercise to a rhythm. Whenever you are struggling with a certain rhythm, you can put the guitar down and attempt to clap the rhythm, just to simplify things. Of course, now that you understand how quarter notes and quarter note rests work, it’s time to play these same exercises on the guitar. Instead of clapping, we’re going to play a note of the guitar. In the next lesson, we will learn how to identify and play different notes on the staff, but for now, just accept that we are using the note ‘E’ for the remaining exercises. E is played by playing the 1st string, open. In tablature, it looks like this:
Let’s do the same ten exercises again. The same principles apply, but now we are using a note on the guitar instead of clapping. Approach the exercises in the same way – play along with the recordings and also try playing the exercises by yourself, while counting out loud. The main difference between clapping and playing the guitar (apart from how it sounds) is that now you will be playing notes that sustain for a duration of time. When you clap, the sound is over as soon as it has begun. When you play a note on the guitar however, you are in control of how long the note rings for. This is important because you should make sure that each note rings for the full beat. When you play a rest however, you should stop the note from sounding. This can be achieved by gently dampening the string with your left hand fingers. When you lightly touch the string, you will stop it from ringing and therefor stop the note.
E Note Exercise 1
E Note Exercise 2
E Note Exercise 3
E Note Exercise 4
E Note Exercise 5
E Note Exercise 6
E Note Exercise 7
E Note Exercise 8
E Note Exercise 9
E Note Exercise 10
A Few Things About Counting:
Each of the exercises in this lesson so far is accompanied by a recording with a click and audible counting. The importance of counting has already been discussed, but it’s worth pointing out that when playing music, the counting happens silently (or subconsciously) in the musicians head. Once you are feeling very confident with the exercises, it’s a good experiment to practise playing them while counting silently. It allows you to really hear the music by itself. However, even if you can count silently successfully, it’s still a good idea to count out loud as a habit. Count silently occasionally, but make counting out loud your default method of practising.
Using A Metronome
We have already discussed the importance of using a metronome in previous lessons. Using a metronome when learning to read is especially important because it involves learning about rhythm. When playing the exercises by yourself (without the recordings), you should always use a metronome. Start slow and increase the tempo when you feel you are ready.