Learning guitar scales goes hand in hand with learning the guitar itself. This page is dedicated to everything related to scales – how to play them, how to use them – as well as a growing library of different scales in different keys and positions.
If you are already somewhat experienced with scales, use the links below to jump straight to a specific lesson. If you’re looking for a specific scale, click on the following link to scroll straight to the Scales Library section.
If you’re a beginner, this page has been designed to take you from knowing absolutely nothing to understanding what they are, how they’re constructed and how they’re used to create music.
Table of Contents
- What Are Guitar Scales?
- Playing Scales On One String
- Playing Scales In One Position
- CAGED Scales
- How To Actually Practise Scales
- Practise Scales By Using Patterns
- What Are Scales Used For?
- Using Scales To Create Solos
- Using Scales To Create Licks
- Using The Major Scale As A Reference Point
- Going Down The Scales Rabbit Hole
- Scales Library
- More Scales Lessons

What Are Guitar Scales?
A scale is a sequence of notes, made up of intervals.
In order to understand what a scale is, you need to know what an interval is.
An interval is simply a measurement of the distance between two notes. There are certain names given to different intervals. The main ones we are concerned with for learning scales are semitones and tones:
- Semitone = One Fret (sometimes referred to as a half step)
- Tone = Two Frets (sometimes referred to as a whole step)
Tones and semitones. One fret and two frets. It’s as simple as that. There are actually larger intervals (e.g. three frets), but for now, just try to remember tones and semitones.
If you play a note on the 5th fret of the B string, and then move up to the 6th string, you have just played two notes that are one semitone apart.
If you play a note on the 8th fret of the A string, then move down to the 6th fret, you have just played two notes that are a tone apart.
- Semitone = One Fret
- Tone = Two Frets
That’s all the theory you really need in order to jump in to scales.
Playing Scales On One String
The quickest and most effective way to learn and understand scales is to play them on one string.
As mentioned before, scales are simply a sequence of notes, separated by intervals. The easiest way to visualise intervals is to restrict yourself to one string only. Therefore, the easiest way to understand scales is to learn them initially on one string, even though this is rarely how they are played when we’re actually practising and using scales.
Here’s how it works.
We’re going to start off by learning the Major scale.
The Major scale is a super important scale (more on that later). It is essentially the Godfather scale, that is used as a reference point for all other scales. But let’s not worry about that now.
Let’s use the Major scale as an example and play it on one string.
The ‘sequence of intervals’ that we need to produce the Major scale looks like this:
Root Note, Tone, Tone, Semitone, Tone, Tone, Tone, Semitone.
You can think of the root note as the ‘home’ note, or starting point for any given scale. For example, the root note of the A Major scale is ‘A’. The root note of the D minor scale is ‘D’. The root note of the Eb (“E Flat”) Major scale is ‘Eb’.
Let’s take the interval sequence that we just looked at, and present it in a more visually engaging way:

With this information, you should be able to try out the Major scale yourself, by playing the above interval sequence on one string. Simply pick any note on any string, and then move up the fretboard on the same string, using the intervals displayed above.
Let’s do an example.
Play the 5th fret of the 4th string. The first interval is a tone (two frets). So move up two frets on the same string to the 7th fret. The next interval is a tone. Move up two more frets to the 9th fret. And so on.
Here’s the full example using guitar tabs

The final interval leads back to the root note (up one octave).
I have deliberately only included tabs, and not notes, because I want you to get a feel for experiencing scales from the visual perspective of intervals.
What we just played was actually the G Major scale, because the root note (first note of the scale) was G.
But remember, we can (and should) do this same exercise from any starting note (root note). Let’s do another example on the 2nd string, starting on the 3rd fret. This will be the D Major scale.

As you can see (and hear), even though we started from a different note, we still played the Major scale, because in both examples, we used the same sequence, or pattern, of intervals.
Do more examples yourself. Once you start to remember the interval pattern, you should be able to move through scales quite quickly and easily.
Let’s do another example, but this time with a different scale. We’re now going to play the natural minor scale.
Here is the interval pattern for the natural minor scale.

Let’s do an example starting on the 5th fret of the 4th string. This is the same note that we used before with the Major scale. Here are the tabs.

You should be able to hear that the natural minor is a different sounding scale, with a different mood, when compared to the Major scale. Again, you should try playing this scale by staying on one string and starting on different notes.
Once you know the interval structure of a given scale, you can very easily play the scale on one string. So far, we’ve looked at two types of scales (Major and natural minor).
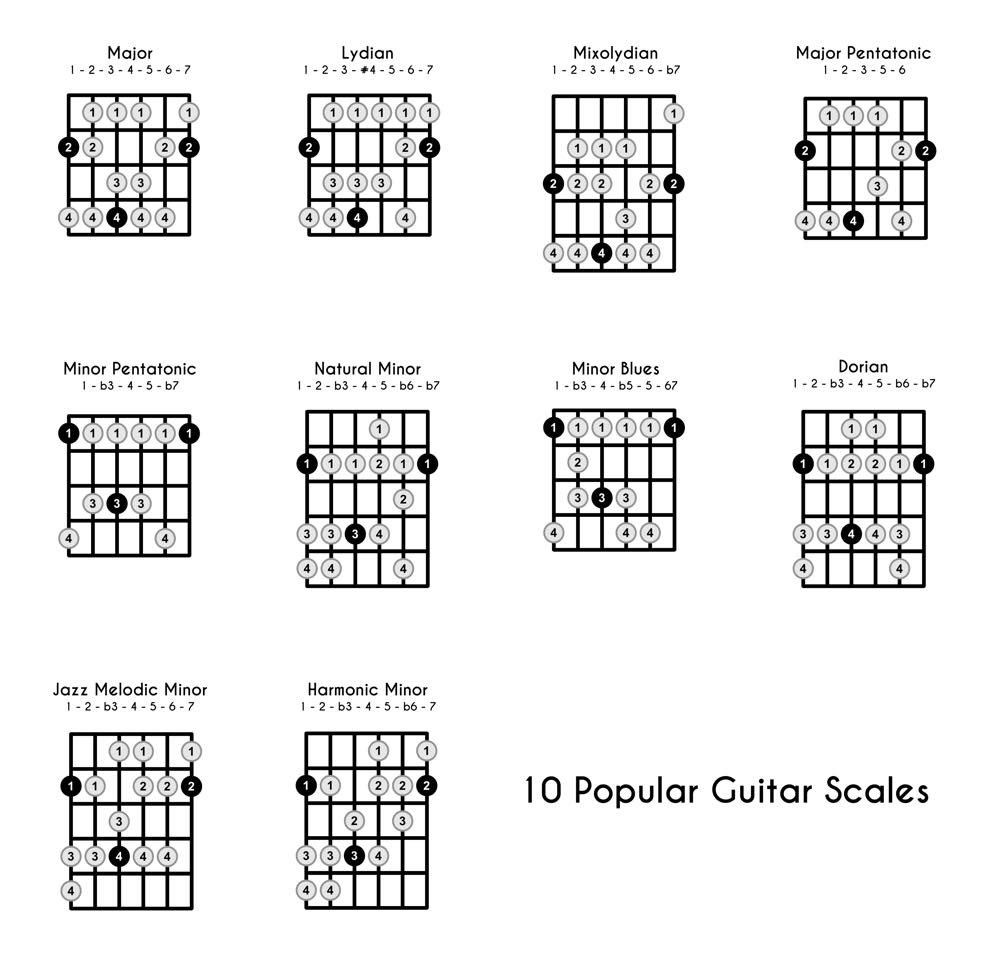
If you want to jump in and play some more scales using the intervals on one string approach, here are some more.

Playing Scales In One Position
Playing scales on one string is a great way to simplify the often mystifying world of scales. But as you might have guessed, it’s rare that we actually play scales on one string, when using them in actual musical situations (like improvising or writing a song).
Instead, we play scales in fixed positions.
To play a scale in a ‘position’, we need to learn how to read scale diagrams (also called scale shapes).
Scale diagrams are very similar to chord diagrams. The vertical lines represent strings. The horizonatal lines represent frets. The circled numbers represent left hand fingers (1st finger, 2nd finger etc.)
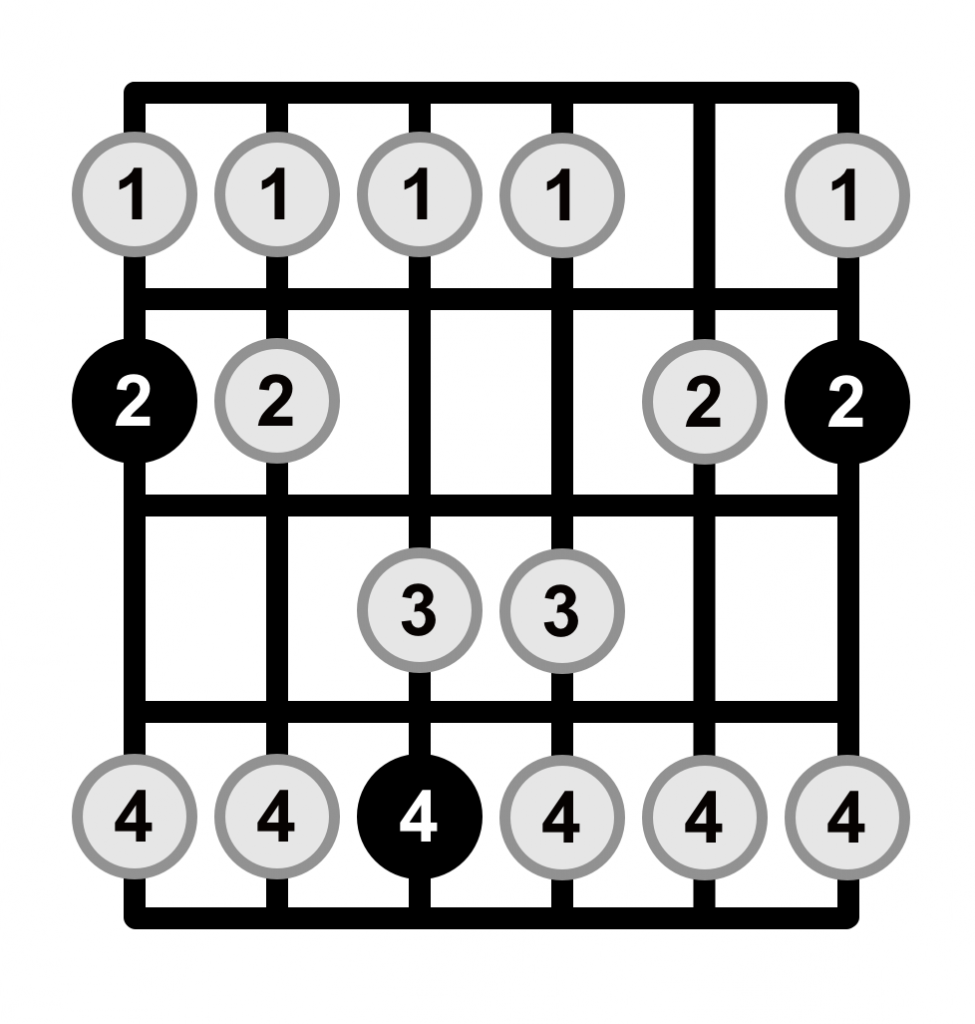
Let’s look at an example scale diagram

Here is a scale diagram for the Major scale, played over one octave. ‘One octave’ simply means that we start the scale from a given note (root note), and then finish when we reach a higher version of that same note.
As I mentioned, the vertical lines represent strings and the horizontal lines represent frets.
If we played the scale using the first four frets, this is what each line would actually represent (with annotations):

For each circled number that you see on the scale diagram (starting from the lowest note), you simply ask yourself the following.
- Which string is it on?
- Which fret is it on?
To play the scale, you simply start from the lowest note (lowest in terms of pitch) and play through every note until you get to the highest note (pitch).
If that sounds confusing, here is the scale diagram again, along with tabs. Each red number in the scale diagram corresponds to the red number in the tabs.

One thing to keep in mind with scale diagrams, is that they are usually ‘moveable’. For example, we played the above scale diagram using the first four frets, but actually, we could play it using any four adjacent frets. For example, we could play the scale starting on the 6th fret.

This would be the B flat Major scale, because the root note (the first note of the scale) is B flat.

Or we could play it starting on the 10th fret, which would give us the D major scale:


Try playing the scale yourself in a few different positions that haven’t been covered so far.
Also, try playing the scale ascending (going from lowest note to highest note) and then descending (going from highest note back down to the lowest note). This is very often how scales are played, in their basic form.
For example, starting on the 6th string and 8th fret (C), would give us the C Major scale. This time, the staff notation is included as well.

CAGED Scales
So you now know how to read scale diagrams.
We only focused on the scale diagram for the Major scale, but of course, there are many other scales as well. Now that you know how to read scale diagrams, we could simply go through different scales, and look at the appropriate diagrams for each scale.
But not so fast.
Learning a scale based on one diagram does not tell the full story. In fact, it doesn’t even tell half the story.
Let’s say we want to play the G Major scale. Based on the diagram that we looked at before, we could simply start on the 3rd fret of the 6th string (which would give us a G) and then play the scale, based on the Major scale diagram.


This is a perfectly good G Major scale. But what if we want to play the G Major scale higher up the fretboard? Remember, the above version of the G Major scale does not move beyond the 5th fret. Yet there are more frets out there. Maybe we want to use higher pitched notes. Maybe we’re soloing, and the solo calls for some notes in a higher position.
The point is, if we only learn a scale in on position, we’re depriving ourselves of access to most of the fretboard. By the way, simply moving higher up the fretboard and using the same ‘shape’ gives us the Major scale in a different key, which is not what we want to do if we’re trying to stay in the one key.
A great way to demonstrate this is to view the entire fretboard, with the notes highlighted.
So far, we’ve used scale diagrams, which are a great way to isolate a small number of frets.
Some people prefer to view the entire fretboard, with the relevant notes highlighted.
Here is an image of a fretboard without any notes highlighed.
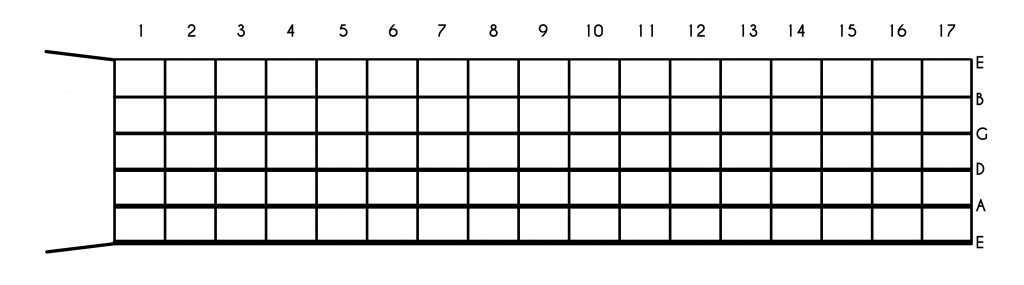
The main thing to observe is that the strings are represented horizontally, and the frets are represented vertically. This is different than the scale diagram format that we have been looking at so far, which has the strings represented vertically and the frets horizontally.
Let’s add the notes of the Major scale based on the shape that we have been looking at so far. Here is the G Major scale.

As you can see from this entire fretboard diagram, our original Major scale shape only allows us to cover one small area of the fretboard, in any given key.
So what’s the solution?
The solution is to learn each scale in five different positions. By learning the scale in five different positions, we will cover the entire fretboard.
Which brings us to CAGED.
In a nutshell, ‘CAGED’ is just a way of saying five different positions.
There is an explanation behind what each of the letters mean, and we’ll go through it, but for what it’s worth, I don’t think the explanation is important. If you just remember that the word CAGED means five positions, you’ve basically got what you need.
But here’s the explanation.
The individual letters of CAGED (C-A-G-E-D) can each be played as basic guitar chords.
You’re probably already familiar with these.

If we take away the open notes and arrange these shapes so that they are all in the one key, the shapes get distributed (more or less) evenly across the fretboard. For example, the key of C:

We have put them all in the same key (key of C), so they’re now all technically C chords, but you can still associate the shapes with their original labels (C, A, G, E, D).
We could arrange the shapes so that they’re in another key. For example Eb.

Again, what we’re left with is five different positions across the fretboard.
So how does this relate to scales? Well, as a general rule, if we learn any scale in five different positions, we will cover the entire fretboard, just like in the chord examples above.
Since we’ve been focusing on the Major scale, let’s keep going with that.
Here are five different ways of playing the Major scale (five different shapes):


The above five images are five different ways of playing the same scale (Major scale). This means that if you play each of the above shapes and keep the root note the same (for example, ‘G’), you will cover five different positions of the fretboard.
This is probably easiest to understand visually. Here are the five shapes again, as well as their placement on the fretboard. For this example, we will choose the key of G (all root notes are G):
We could technically go through each of the above five shapes and associate each one with a letter from the word ‘CAGED’, but as I mentioned earlier, that’s not important. The important thing is that you understand the following.
CAGED = five positions.
One thing to keep in mind is that even though each of the shapes uses the same root note as a starting point (in the above example, ‘G’), we are using different G notes across the fretboard. Which brings me to another point.
You need to have a strong knowledge of the guitar fretboard if you really want to explore scales.
In a nutshell, playing scales involves learning shapes, knowing what they’re called (Major scale, Lydian scale etc.) and being familiar with the fretboard, so that you can play them in specific keys. While you don’t necessarily need to know every note of the scale as you’re playing it (just remember the shape), you do need to know what the first note is, so that you know what key you’re in.
How To Actually Practise Scales
Now that you understand the importance of five positions (CAGED), you can choose a scale and start practising it.
Before you do that though, we need to expand on our example Major scales that we looked at before.
In the example scales that we’ve looked at so far, we have played scales over one octave. That simply means that each scale has started from a root note (the root note depends on where you choose to play the scale) and finishes on the same root note.
Here’s an example of what this looks like using the C Major scale:

However, when we use the CAGED system, we play scales in positions. By only playing one octave inside a given position, we’re leaving out extra notes (in different octaves) that occur in these positions.
Let’s take the first Major scale that we looked at:
You can see from this picture that there are notes inside this position that don’t actually get played, if we limit ourselves to one octave.
The solution isn’t just to play the scale over two octaves, as this still won’t cover all of the available notes in the position.

The solution is learn the scale by covering all of the available notes in any given position. Like this:
What this basically tells us is that for this particular Major scale shape, these are all of the notes that are part of the Major scale.
The beauty of this approach is that we can limit ourselves to one octave if we want…

…Or we could play the scale over two octaves:

But for the sake of covering all of the notes in the position, I recommend the following process:
- Start from the lowest root note
- Ascend through each note of the scale until you reach the highest note available in the position
- Descend until you reach the lowest note available in the position
- Ascend back to the original lowest root note.
Here’s the Major scale shape, with each of these things annotated.

The beauty of this approach is that you start and finish on the same note (root note), yet you cover every note available in the position.
Here’s how this would look if we played the above shape, starting on the 5th fret (A Major scale).

The reason why it’s important to cover all of the notes in a given position is that when we improvise, or solo (we’ll cover this later), we want to be able have the option of using all of the notes available to us in a given position. If we only learn one octave (or even two), we’re leaving notes out.
So what we want to do now is go back to our five original one-octave Major scale shapes, and see how they look when they include all of the available notes, for each shape.


If we play these five shapes in the key of G Major, it will look like this:

By playing each of the five shapes while making the root note for each shape G, we get five different positions of the G Major scale that cover the entire fretboard (12 frets).


The five shapes in the above image have been arranged in order. Your aim should be to play one shape after another, and move higher up the fretboard with each shape. The first shape should be followed by the second shape, and then by the third, and so on.
One thing to keep in mind however, is that the fifth shape leads back to the first shape.

Therefore, the five CAGED shapes are actually best represented as a cycle:
Thinking of the five shapes as a cycle allows you to do two things. You can keep going beyond the twelfth fret, by the going back to the first shape.
It also means that the starting shape can change, depending on the key that you’ve chosen. For a given key, I always recommend starting with the lowest possible shape (lowest fret) and then moving through the other four shapes from there.
Otherwise, you’ll end up starting high up on the fretboard, and moving higher, until you’re in an unpractical position.
For example, let’s say you want to play the five D Major scale positions, and you start from the same shape that we started with when we played the G Major scale:

If you started with this shape, you would have to start on the 10th fret. The next four shapes would then move higher and higher up the fretboard.

While this is theoretically possible, it’s impractical. A much better approach is to start with the lowest possible shape for D Major (try not to use open strings).
In the key of D, the first shape (lowest possible) would be the following


Therefore, our five positions would look like this (starting shape is circled).

This process might take a bit of getting used to. Remember, it requires that you have a pretty solid understanding of the notes along the fretboard, or can at least figure them out on the spot. The root notes for each of the shapes are the navigation points for playing the scales in specific keys.
The good news is that if you find this confusing, you can simply go to the scale library (at the bottom of this page) and start playing through different keys by reading through the tabs and notes for specific scales and keys.
It’s amazing how much easier it is to comprehend something when you’re actually playing through different examples.
Practise Scales Using Patterns.
Another great practice technique with scales, is to use patterns. Scale patterns add an extra level of technical and cognitive difficulty to the process of mastering scales.
A scale pattern is simply a numerical rearrangement of the notes of a particular scale.
The Major scale, for example, has seven notes, which can be represented by the numbers 1 to 7.

A common pattern is the following.

This is how it would look for the G Major scale (G – A – B – C – D – E – F# – G):

Here’s another example.

Here’s how it looks (again with the G Major scale).


There are many different possible combinations. Some patterns (such as the first example) sound quite musical and can be used when improvising.
Apart from the musical benefits of learning patterns, they’re also a great way to demonstrate that you have really mastered a scale. Sometimes, when we’re practising a scale over and over, we can convince ourselves that we’ve mastered the scale, but have only really developed muscle memory (which is important) of the scale being played from start to finish. But mastering scales involves being able to move freely between different notes of a given scale. You should be able to visualise the entire scale without necessarily playing the notes.
By learning patterns, you’re forced to know the scale at a deeper level, and be familiar with the scale as whole.
Remember, you can (and should) come up with your own patterns. It’s a great way to challenge yourself. Think you’ve mastered a scale? Come up with a pattern and test yourself!
What Are Scales Used For?
Everything up until this point has been aimed towards playing and learning scales. This is for a good reason. Scales are a lot easier to understand if you can already play them. Just like other things on the guitar, such as chords, I always encourage students to play scales and then start exploring how they’re used, rather than getting to bogged down in theory and not actually doing any playing.
That being said, it’s important to explore and understand the purpose of scales. Why do we learn scales?
Are they just glorified finger exercises that have an interesting kind of sound? Do they help us learn the fretboard better? Do we use them to write music?
The truth is that there are actually numerous reasons why we learn scales.
Using Scales To Create Solos
Guitarists use scales for improvising and constructing solos. Each scale has a unique sound, or mood, which fit over certain chords. This is an overly simplified summary of how scales are used when soloing, but it is a good starting point.
The Major scale, for example, works well over Major chords.
The Lydian mode also works well over Major chords, but has a brighter sound.
The Major pentatonic scale has a folky/bluesy vibe, which works effortlessly over Major chords.
As I mentioned, this explanation is deliberately over simplified. But it outlines a very important principle.
Scales can be used over chords and chord progressions.
The best way to experience this is to practise improvising over one-chord vamps. A one-chord vamp is a backing track that includes one chord and loops continuously (usually for a very long time).
Here’s how to practise using a scale and a one-chord vamp:
- Choose a scale.
- Find an appropriate backing track.
- Practise playing the scale and improvising, using the notes from the scale.
You can easily search YouTube for backing tracks. Just type a chord in to the search bar, as well as “backing track”, and you will get hundreds of results.
The thing I love about this process, is that it’s a great way of really getting to know a scale, in a fun and challenging context. Scale practice can sometimes feel very monotonous, but when you use backing tracks, you can turn scale practice into a kind of jam session. You can spend time simply playing through the chosen scale itself, and you can mix that up with free improvisation within the scale.
Using Scales To Create Licks
While I highly recommend putting on a vamp and jumping in the deep end, you will eventually find that even though you have become very familiar with a particular scale, you feel your improvising sounds a bit ‘scalish’ and boring.
This is where licks come in. A lick is simply a short, musical phrase, usually based on a particular scale. Think of it like a musical sentence.
For example, here is an E minor blues scale played over one octave.


Here is a lick, based off the e minor blues scale:

Learning licks on the guitar is like learning phrases in a foreign language. While learning grammar and singular words is important, real conversation happens when you put it together in full sentences.
The same goes with improvising. We can and should learn scales, but we can turn these scales in to meaningful music, by learning licks.
Because licks are just short musical phrases, if you learn enough of them, they will eventually come out naturally when you’re jamming and improvising. Sometimes they will come out exactly as you’ve learnt to play them, but the real power in learning licks is that you will eventually be able to modify them, join them together, change them slightly or completely, so that when you’re improvising, you reach a point where you feel like you’re creating something completely new.
So how should you go about learning licks?
- Learn other people’s licks.
- Create your own licks.
Both of these processes are an essential part of developing fluency with a scale. The easiest place to start is to learn licks that have already been created by someone else. You can find licks in books, or on the internet. Alternatively, you can simply listen to a guitar solo that you like, and transcribe the licks that you hear within a solo.
Let’s do some example licks with the A minor blues scale.

The A minor blues scale is one of the most used scales for guitarists. It works well over the A minor chord and as the name suggests, has a bluesy sound.
Here are five A minor blues licks:


You should try playing these licks. As you can hear (if you play them), they capture the sound and ‘vibe’ of the scale, but they don’t sound like scales, they sound like musical phrases.
Once you have learnt some licks for the scale that you are working on, you should go back to your one-chord vamp and practise using the licks while improvising. Remember, to get the most out of the licks, you need to experiment with them. Play them in their basic format first, but them modify them as you’re improvising.
Creating Your Own Licks
Creating your own licks, based on notes from a scale that you are working on is an important and valuable process. Firstly, it’s an exercise in musical composition. By deliberately crafting musical phrases, you are developing your creative skills as a musician and guitarist. In short, if you can’t create a lick when you have time to think and revise, how are you expected to do it on the fly, when improvising?
The other benefit to creating your own licks, is that it gives you more material to work with. It sounds simple, but the more licks you compose for a given scale, the more fluent you will be with that scale, when soloing.
This is a topic that could be expanded upon immensely. As we discussed earlier, when looking at CAGED, you should learn each scale in five different positions. That means you should also learn licks for each of the five positions of a given scale.
You can also use licks to help move from one position to another. Let’s say you want to move between two different positions when improvising, using the A minor blues scale. One way that you can develop this ability is to learn licks that transition from one shape to another, like the following:
We could explore the concept of licks and improvisation much further. We haven’t talked about changing from one scale to another, or even how to actually figure out which scale works over which chord, but that’s beyond the scope of this lesson. There will be links at the end of this lesson to some related topics.
Using The Major Scale As A Reference For All Other Scales
So far, we’ve looked at scales in isolation. For example, the Major scale is a scale you can use over Major chords. The minor pentatonic scale works well over minor chords. You understand how CAGED works and how to practise scales in positions. You could simply dive into the scale library and start playing scales every spare minute of the day.
But there’s one really important thing that we need to cover.
The Major scale is the master scale, from which all other scales can be derived.
Here’s another way of putting it.
If you become really familiar with Major scales, you can figure out every other scale by modifying the Major scale.
Here’s why.
The notes that are in the Major scale tell us the notes that are in a given key. For example, the notes in the C Major scale are…
- C – D – E – F – G – A – B
Therefore, the notes in the key of C are:
- C – D – E – F – G – A – B
The notes in the Bb Major scale are:
- Bb – C – D – Eb – F – G – A
Therefore, the notes in the key of Bb are:
- Bb – C – D – Eb – F – G – A
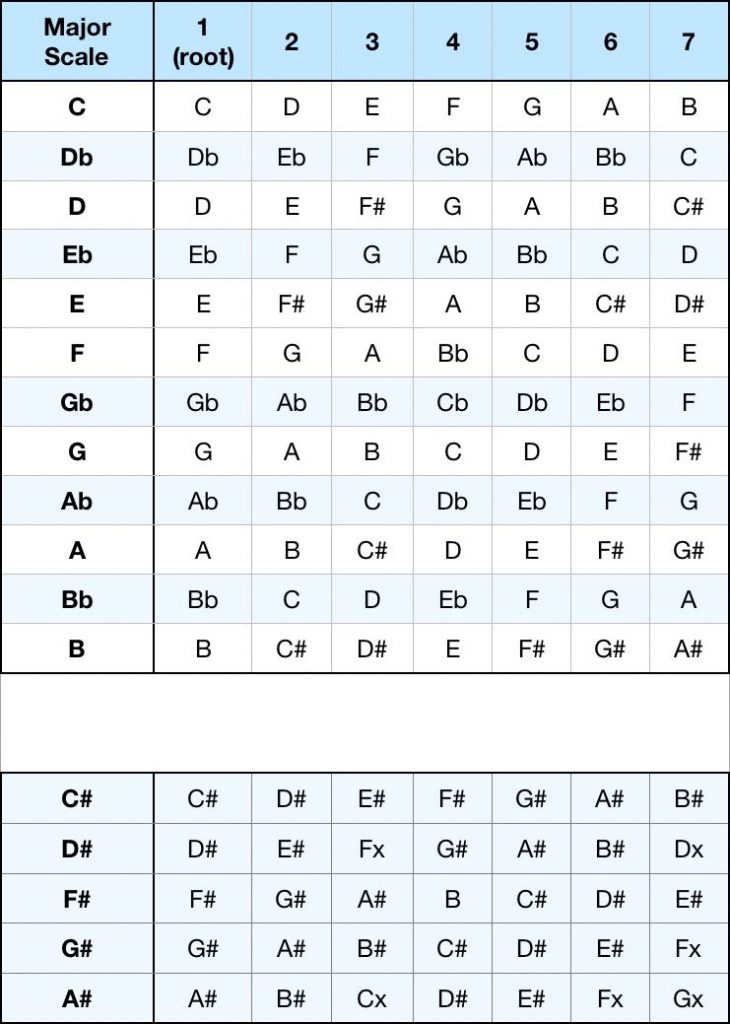
Major scale notes give you the notes in a key. For this reason alone, you should become familiar with Major scales and the notes in each one. There are only twelve to learn (not including enharmonically equivalent scales – for example Ab is the same as G#).
Here’s a chart of the 12 Major scales with each scale’s notes:
Because Major scales are so important, we actually use them as a reference point, when discussing other scales. For example, let’s look at the natural minor scale.
Earlier, we looked at the natural minor scale, based on its interval sequence. Here’s another way we could look at it.
The natural minor scale contains the following:

As mentioned earlier, these ‘b’s are the symbol for ‘flat’. So the same thing could be written like this

As you may have guessed, this tells us how to play the natural minor scale, using the Major scale as a reference point.
This is actually a much more common way of referring to scales than looking at the intervals inside a scale (although that’s an easier way to get started).
When we see the word ‘flat’ (or the symbol ‘b’), this simply means that we lower a note of the Major scale by one semitone (remember that thing?).
Let’s do an example.
The F Major scale contains the following notes:
- F – G – A – Bb – C – D – E
As we just looked at, the natural minor is made up of the following
- 1 – 2 – b3 – 4 – 5 – b6 – b7
Therefore, the F natural minor scale contains the following notes:
- F – G – Ab – Bb – C – Db – Eb
Here’s a visual example showing how we got there:

Let’s do another example.
The Major pentatonic scale contains the following:

This is an interesting example, because none of the notes of the Major scale are altered, but only some of the notes (of the original Major scale) are included.
The A Major scale contains the following notes:
- A – B – C# – D – E – F# – G#
Therefore, the A Major pentatonic scale contains the following notes
- A – B – C# – E – F#

Becoming familiar with Major scales is super important.
Using the Major scale as a reference point also implies certain characteristics of other scales.
For example, the harmonic minor scale contains a ‘flat 3’. Not only do we know that the ‘flat 3’ refers to the 3rd note of the Major scale being lowered by a semitone, but we can learn to understand how that ‘flat 3’ sounds and behaves. The inclusion of a flat 3 is what gives a scale (or chord) its minor qualities.
As another example, a ‘flat 2’ that exists within a scale will generally have a dark, dissonant sound.
As a general guide, you can think of all scales as being alterations of the Major scale.
Notes from the Major scale can be included, excluded or altered to form another scale, with each inclusion, exclusion or alteration having a specific characteristic.
Earlier, we looked at a list of scales based on intervals.
Here is a list of those same scales, with scale degrees included:

As a tip, the easiest way to explore the concept of producing scales by referencing the Major scale is to start off by using the C Major scale (C – D – E – F – G – A – B) as the reference scale. Because the C Major scale contains no sharps or flats, the process of altering notes is a lot easier.
Going Down The Scales Rabbit Hole
There is obviously a lot of information on this page, and each subheading could be expanded on immensely. It’s easy to feel overwhelmed. But that’s the nature of learning and applying scales. It’s not a topic that you master in a day, a year or even a decade.
Scales are an endless source of musical development. Learning new patterns, new licks, connecting different scales together, applying scales to different musical contexts. The possibilities are literally endless.
With all that being said, here is the growing scale library that is available on this site, followed by some extra scale related lessons.
As mentioned earlier, sometimes the best thing to do when you’re feeling confused by theoretical scale concepts, is to actually take your focus away from the theory and simply practise playing the scales themselves. That’s where the scale library comes in…
Scales Library
Here is the scales library, containing links to specific guitar scales. If you want the notes and tabs for the Db Mixolydian mode (for example), you can visit that page and jump right in. A lot of people visit this page just so they can find the notes/tabs for a specific scale that they are looking for.
Major Pentatonic
- A Major Pentatonic
- Ab Major Pentatonic
- A# Major Pentatonic
- B Major Pentatonic
- Bb Major Pentatonic
- C Major Pentatonic
- C# Major Pentatonic
- D Major Pentatonic
- Db Major Pentatonic
- D# Major Pentatonic
- E Major Pentatonic
- Eb Major Pentatonic
- F Major Pentatonic
- F# Major Pentatonic
- G Major Pentatonic
- Gb Major Pentatonic
- G# Major Pentatonic
Minor Pentatonic
- A Minor Pentatonic
- Ab Minor Pentatonic
- A# Minor Pentatonic
- B Minor Pentatonic
- Bb Minor Pentatonic
- C Minor Pentatonic
- C# Minor Pentatonic
- D Minor Pentatonic
- Db Minor Pentatonic
- D# Minor Pentatonic
- E Minor Pentatonic
- Eb Minor Pentatonic
- F Minor Pentatonic
- F# Minor Pentatonic
- G Minor Pentatonic
- Gb Minor Pentatonic
- G# Minor Pentatonic
More Scales Lessons
There is a lot of information on this page about scales. But some of the individual topics covered (plus a few more) are explored in greater detail in the individual lessons below.
- Guitar modes explained
- How to read scale diagrams
- How to build chords using scales
- How to improvise
- Lead guitar playing
- What is CAGED?